Spring Boot #
概念 #
Spring Boot 基于 Spring 开发,Spirng Boot 本身并不提供 Spring 框架的核心特性以及扩展功能,只是用于快速、敏捷地开发新一代基于 Spring 框架的应用程序。也就是说,它并不是用来替代 Spring 的解决方案,而是和 Spring 框架紧密结合用于提升 Spring 开发者体验的工具。Spring Boot 以约定大于配置的核心思想,默认帮我们进行了很多设置,多数 Spring Boot 应用只需要很少的 Spring 配置。同时它集成了大量常用的第三方库配置(例如 Redis、MongoDB、Jpa、RabbitMQ、Quartz 等等),Spring Boot 应用中这些第三方库几乎可以零配置的开箱即用。
特征 #
- 为所有Spring开发者更快的入门
- 开箱即用,提供各种默认配置来简化项目配置
- 内嵌式Servlet容器(Tomcat、Jetty 或者 Undertow)简化Web项目
- 没有冗余代码生成和XML配置的要求
Spring Initializr #
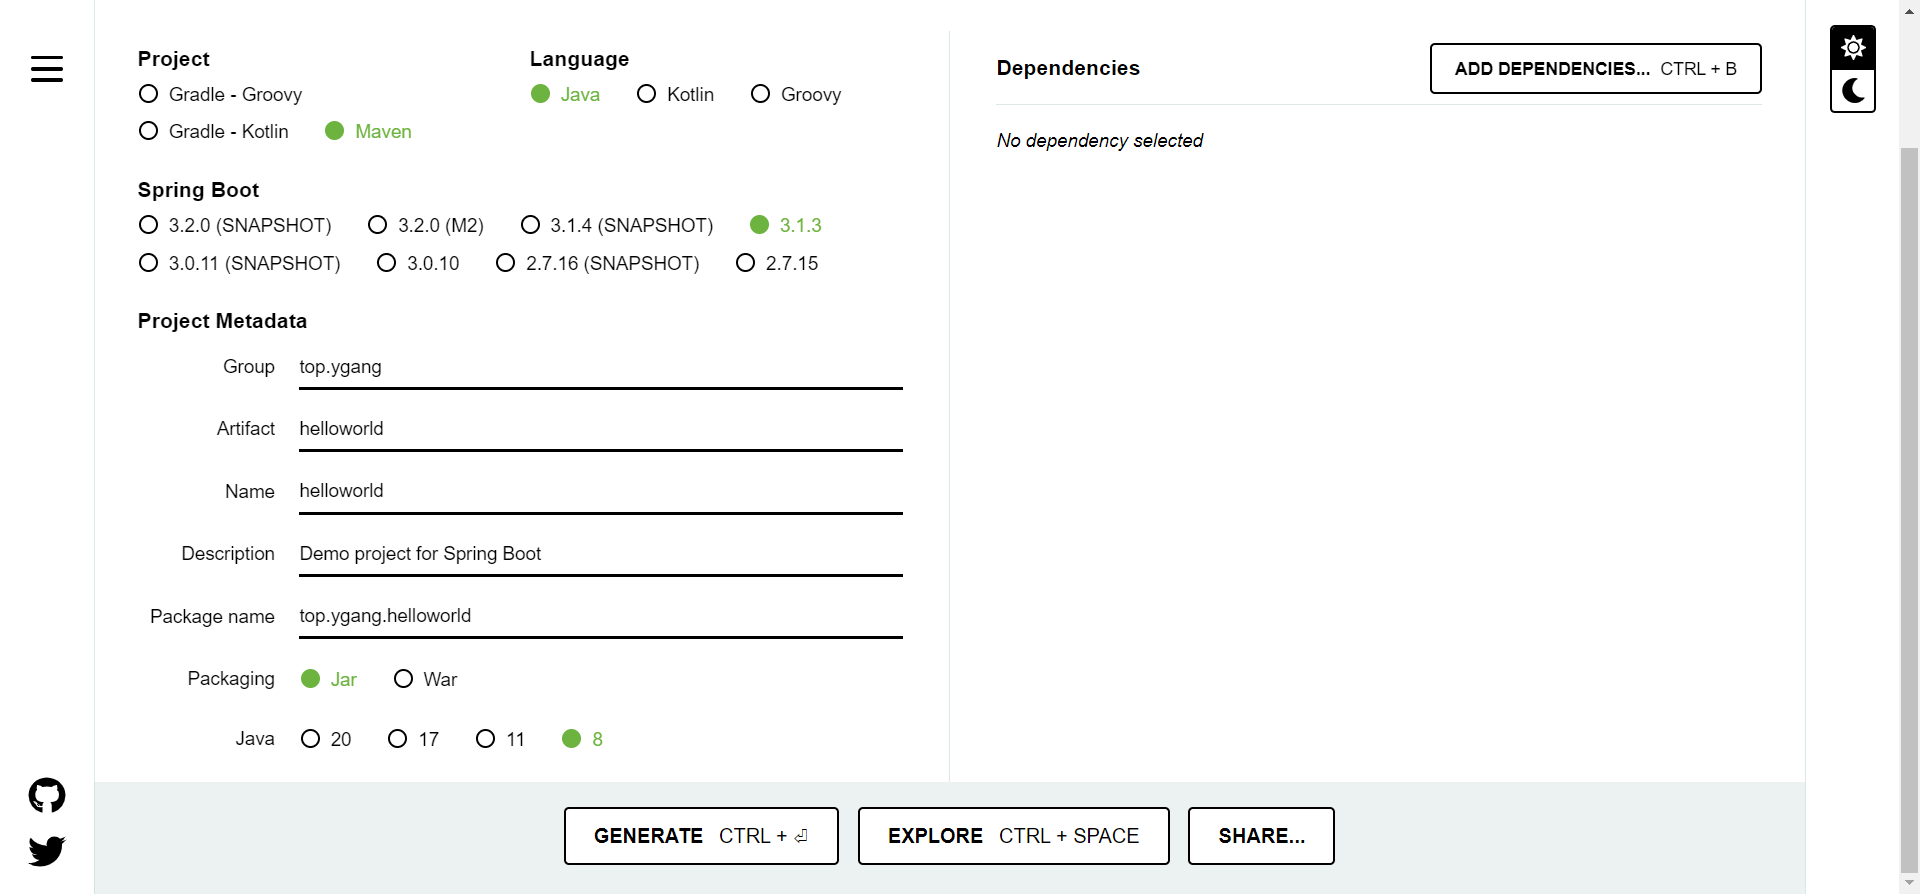
Spring官方提供了Spring Initializr:https://start.spring.io/,帮助快速的搭建Spring Boot工程
Hello World #
pom.xml #
<?xml version="1.0" encoding="UTF-8"?>
<project xmlns="http://maven.apache.org/POM/4.0.0"
         xmlns:xsi="http://www.w3.org/2001/XMLSchema-instance"
         xsi:schemaLocation="http://maven.apache.org/POM/4.0.0 http://maven.apache.org/xsd/maven-4.0.0.xsd">
    <modelVersion>4.0.0</modelVersion>

    <groupId>top.ygang</groupId>
    <artifactId>springboot-demo</artifactId>
    <version>1.0-SNAPSHOT</version>
    <packaging>jar</packaging>

    <!--  一般情况下使用Springboot官方提供的启动器父依赖统一管理springboot各组件版本  -->
    <parent>
        <groupId>org.springframework.boot</groupId>
        <artifactId>spring-boot-starter-parent</artifactId>
        <version>2.7.5</version>
    </parent>

    <properties>
        <maven.compiler.source>8</maven.compiler.source>
        <maven.compiler.target>8</maven.compiler.target>
    </properties>

    <dependencies>
        <!--   web场景启动器    -->
        <dependency>
            <groupId>org.springframework.boot</groupId>
            <artifactId>spring-boot-starter-web</artifactId>
        </dependency>
    </dependencies>

    <build>
        <plugins>
            <!--  springboot打包插件  -->
            <plugin>
                <groupId>org.springframework.boot</groupId>
                <artifactId>spring-boot-maven-plugin</artifactId>
            </plugin>
        </plugins>
    </build>
</project>
启动类 #
package top.ygang.springbootdemo;

import org.springframework.boot.SpringApplication;
import org.springframework.boot.autoconfigure.SpringBootApplication;

@SpringBootApplication
public class ApplicationStart {

    public static void main(String[] args) {
        SpringApplication.run(ApplicationStart.class,args);
    }
}
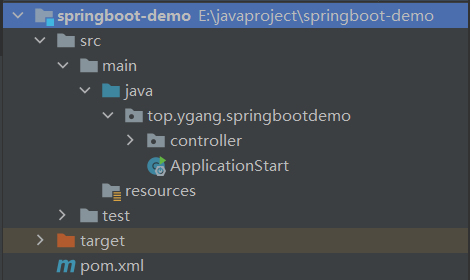
注意:启动类一般要放在工程的顶级目录中(相对于其他类)
Controller #
package top.ygang.springbootdemo.controller;

import org.springframework.web.bind.annotation.GetMapping;
import org.springframework.web.bind.annotation.RestController;

@RestController
public class DemoController {

    @GetMapping("/helloworld")
    public String helloworld(){
        return "Hello Spring Boot!";
    }
}
访问 #
spring-boot-starter-web的默认端口为:8080

SpringBoot配置文件 #
Springboot默认的配置文件名为:application.yml或application.properties
application.properties #
#端口号
server.port=8080
#项目名,可以不写,默认localhost:8080就可以访问项目
server.servlet.context-path=/app
#配置静态资源访问路径,resources文件夹下
spring.resources.static-locations=classpath:/templates/

#前缀后缀
spring.mvc.view.prefix=/
spring.mvc.view.suffix=.jsp

#数据库连接池
spring.datasource.type=com.alibaba.druid.pool.DruidDataSource
# spring.datasource.driverClassName=org.postgresql.Driver
# 初始化时建立物理连接的个数
spring.datasource.druid.initial-size=5
# 最小连接池数量
spring.datasource.druid.min-idle=5
# 最大连接池数量
spring.datasource.druid.max-active=20
# 获取连接时最大等待时间,单位毫秒
spring.datasource.druid.max-wait=60000
# 申请连接的时候检测,如果空闲时间大于timeBetweenEvictionRunsMillis,执行validationQuery检测连接是否有效。
spring.datasource.druid.test-while-idle=true
# 既作为检测的间隔时间又作为testWhileIdel执行的依据
spring.datasource.druid.time-between-eviction-runs-millis=60000
# 销毁线程时检测当前连接的最后活动时间和当前时间差大于该值时,关闭当前连接
spring.datasource.druid.min-evictable-idle-time-millis=30000
spring.datasource.url=jdbc:mysql://localhost:3306/mana?useUnicode=true&characterEncoding=utf8&serverTimezone=Asia/Shanghai&useSSL=false
spring.datasource.username=root
spring.datasource.password=123456
spring.datasource.driverClassName=com.mysql.cj.jdbc.Driver

#redis配置
spring.redis.host = localhost
spring.redis.password = eduask
spring.redis.port = 6379

#分页拦截器,为true先设定数据库中查询的范围,再根据条件查询
pagehelper.reasonable=false

#mapper.xml扫描,如果mapper.xml和mapper.java在一个包里,那么注解MapperScan就可以了
mybatis.mapper-locations=classpath*:top.ygang.mapper/*.xml
YML #
全名**:YAML Ain’t Markup Language**
以数据为中心,比json、xml等更适合做配置文件
基本语法 #
key:[空格]value:表示一对键值对(空格必须有)- 以**空格的缩进(不可以使用TAB缩进)**来控制层级关系,只要是左对齐的一列数据,都是同一个层级的
- 属性和值也是大小写敏感
值的写法 #
字面量 #
- 普通的值(数字,字符串,布尔)
k: v:字面直接来写;- 字符串默认不用加上单引号或者双引号
"":双引号;不会转义字符串里面的特殊字符;特殊字符会作为本身想表示的意思- name:
"zhangsan \n lisi" - 输出:
zhangsan 换行 lisi
- name:
'':单引号;会转义特殊字符,特殊字符最终只是一个普通的字符串数据- name:
'zhangsan \n lisi' - 输出:
zhangsan \n lisi
- name:
对象、Map #
在下一行来写对象的属性和值的关系;注意缩进
friends:
   lastName: zhangsan
   age: 20
#行内写法:
friends: {lastName: zhangsan,age: 18}
数组、集合(List、Set) #
用- value表示数组中的一个元素
pets:
  - cat
  - dog
  - pig
application.yml文件 #
#端口号
server:
   port: 8080
   servlet:
      context-path: /app

#配置thymeleaf的视图解析器ThymeleafViewResolver
spring:
   thymeleaf:
      prefix: classpath:/templates/
      suffix: .html
      mode: HTML5
      cache: false
      encoding: UTF-8

   #redis配置
   redis:
      host: localhost
      password: eduask
      port: 6379

   #数据库配置
   datasource:
      type: com.alibaba.druid.pool.DruidDataSource
      driver-class-name: com.mysql.cj.jdbc.Driver
      url: jdbc:mysql://localhost:3306/manage?useUnicode=true&characterEncoding=utf8&serverTimezone=Asia/Shanghai&useSSL=false
      username: root
      password: 123456
      #数据库连接池
      druid:
         # 初始化时建立物理连接的个数
         initial-size: 5
         # 最小连接池数量
         min-idle: 5
         # 最大连接池数量
         max-active: 20
         # 获取连接时最大等待时间,单位毫秒
         max-wait: 60000
         # 申请连接的时候检测,如果空闲时间大于timeBetweenEvictionRunsMillis,执行validationQuery检测连接是否有效。
         test-while-idle: true
         # 既作为检测的间隔时间又作为testWhileIdel执行的依据
         time-between-eviction-runs-millis: 60000
         #销毁线程时检测当前连接的最后活动时间和当前时间差大于该值时,关闭当前连接
         min-evictable-idle-time-millis: 30000
   servlet:
      #文件上传配置
      multipart:
         enabled: true
         #单个文件的大小
         max-file-size: 20MB
         #限制总上传文件的大小
         max-request-size: 20MB

#分页拦截器
pagehelper:
   reasonable: false

#日志
logging:
  level:
    root: info
    top.ygang: debug
    org.springframework.security: warn
区分开发和生产环境配置文件 #
在resource下新建三个配置文件:application.yml(通用),application-dev.yml(开发),application-prod.yml(生产)
使用方式1,在application.yml中指定当前使用的配置文件类型
spring:
  profiles:
    active: dev
使用方式2,在jar包启动的使用,添加命令,指定使用的配置文件类型
java -jar test.jar --spring.profiles.active=dev
读取配置文件的信息 #
1、读取单个参数 #
spring:
  application:
    name: test
在java bean代码中读取name属性值,使用@Value注解
@Value("${spring.application.name}")
private String name;
2、读取同一节点下的多个属性(对象) #
minio:
  endpoint: localhost:9000
  accesskey: minioadmin
  secretkey: minioadmin
使用@ConfigurationProperties的配置类用于读取配置文件,在spring容器启动时,就会在yml中读取
@Component
@Data
@ConfigurationProperties(prefix = "minio")
public class MinioConfig{
    private String endpoint;
    private String accesskey;
    private String secretkey;
}
spring-boot-configuration-processor #
有的时候,我们自己开发一个模块,希望我们的Bean对应的配置文件项会有提示,例如

就可以引入该依赖,搭配注解@ConfigurationProperties使用
<dependency>
    <groupId>org.springframework.boot</groupId>
    <artifactId>spring-boot-configuration-processor</artifactId>
    <optional>true</optional>
</dependency>
引入后,要求Bean必须添加@Component注解,并且属性必须有public的getter、setter,例如
@ConfigurationProperties(prefix = "student")
@Component
public class Student {
    /**
     * 编号
     */
    private String id = "001";
    /**
     * 姓名
     */
    private String name = "lucy";

    public String getId() {
        return id;
    }

    public void setId(String id) {
        this.id = id;
    }

    public String getName() {
        return name;
    }

    public void setName(String name) {
        this.name = name;
    }
}
然后就可以build project,会在target/classes/META-INF目录下生成spring-configuration-metadata.json文件,里面有对改配置项的说明
{
  "groups": [
    {
      "name": "student",
      "type": "top.ygang.springbootdemo.Student",
      "sourceType": "top.ygang.springbootdemo.Student"
    }
  ],
  "properties": [
    {
      "name": "student.id",
      "type": "java.lang.String",
      "description": "编号",
      "sourceType": "top.ygang.springbootdemo.Student"
    },
    {
      "name": "student.name",
      "type": "java.lang.String",
      "description": "姓名",
      "sourceType": "top.ygang.springbootdemo.Student"
    }
  ],
  "hints": []
}
场景启动器 #
解决的问题 #
在SpringBoot出现之前,如果我们想使用SpringMVC来构建我们的web项目,必须要做的几件事情如下:
- 首先项目中需要引入SpringMVC的依赖
- 在web.xml中注册SpringMVC的
DispatcherServlet,并配置url映射 - 编写
springmcv-servlet.xml,在其中配置SpringMVC中几个重要的组件,处理映射器(HandlerMapping)、处理适配器(HandlerAdapter)、视图解析器(ViewResolver) - 在
applicationcontext.xml文件中引入springmvc-servlet.xml文件 - …
以上这几步只是配置好了SpringMVC,如果我们还需要与数据库进行交互,就要在application.xml中配置数据库连接池DataSource,如果需要数据库事务,还需要配置TransactionManager…
这就是使用Spring框架开发项目带来的一些的问题:
- 依赖导入问题: 每个项目都需要来单独维护自己的依赖,在项目中使用到什么功能就需要引入什么样的依赖。手动导入依赖容易出错,且无法统一集中管理
- 配置繁琐: 在引入依赖之后需要做繁杂的配置,并且这些配置是每个项目来说都是必要的,例如web.xml配置(Listener配置、Filter配置、Servlet配置)、log4j配置、数据库连接池配置等等。这些配置重复且繁杂,在不同的项目中需要进行多次重复开发,这在很大程度上降低了我们的开发效率
而在SpringBoot出现之后,它为我们提供了一个强大的功能来解决上述的两个痛点,这就是SpringBoot的starters(场景启动器)。
Spring Boot通过将我们常用的功能场景抽取出来,做成的一系列场景启动器,这些启动器帮我们导入了实现各个功能所需要依赖的全部组件,我们只需要在项目中引入这些starters,相关场景的所有依赖就会全部被导入进来,并且我们可以抛弃繁杂的配置,仅需要通过配置文件来进行少量的配置就可以使用相应的功能。
原理 #
在导入的starter之后,SpringBoot主要帮我们完成了两件事情
- 相关组件的自动导入
- 相关组件的自动配置
SpringApplication.run() #
SpringApplication.run()方法主要完成了以下功能:
- 创建SpringApplication对象;在对象初始化时保存事件监听器,容器初始化类以及判断是否为web应用,保存包含main方法的主配置类。
- 调用run方法;准备spring的上下文,完成容器的初始化,创建,加载等。会在不同的时机触发监听器的不同事件。
@SpringBootApplication #
这个注解作为一个Springboot工程的开始,也是Springboot的核心注解,它有如下两个核心的元注解
@Target({ElementType.TYPE})
@Retention(RetentionPolicy.RUNTIME)
@Documented
@Inherited
@SpringBootConfiguration
@EnableAutoConfiguration
@ComponentScan(
    excludeFilters = {@Filter(
    type = FilterType.CUSTOM,
    classes = {TypeExcludeFilter.class}
), @Filter(
    type = FilterType.CUSTOM,
    classes = {AutoConfigurationExcludeFilter.class}
)}
)
public @interface SpringBootApplication {}
@SpringBootConfiguration #
这个注解有一个元注解@Configuration,也就是标志了这个类是一个配置类,并且注入Spring容器进行管理
@EnableAutoConfiguration #
这个注解是Springboot开启自动配置的核心注解
@Target({ElementType.TYPE})
@Retention(RetentionPolicy.RUNTIME)
@Documented
@Inherited
@AutoConfigurationPackage
@Import({AutoConfigurationImportSelector.class})
public @interface EnableAutoConfiguration {
    String ENABLED_OVERRIDE_PROPERTY = "spring.boot.enableautoconfiguration";

    Class<?>[] exclude() default {};

    String[] excludeName() default {};
}
@AutoConfigurationPackage的作用是将main包下的所有组件注册进容器@Import({AutoConfigurationImportSelector.class})的作用是加载自动装配类:AutoConfigurationImportSelector,自动装配的核心功能也就是通过这个类实现的
AutoConfigurationImportSelector有一个关键的方法如下
protected AutoConfigurationEntry getAutoConfigurationEntry(AnnotationMetadata annotationMetadata) {
    //第1步:判断自动装配开关是否打开
   if (!isEnabled(annotationMetadata)) {
      return EMPTY_ENTRY;
   }
    //第2步:用于获取注解中的exclude和excludeName。
    //获取注解属性
   AnnotationAttributes attributes = getAttributes(annotationMetadata);
    //第3步:获取需要自动装配的所有配置类,读取META-INF/spring.factories
    //读取所有预配置类
   List<String> configurations = getCandidateConfigurations(annotationMetadata, attributes);
    //第4步:符合条件加载
    //去掉重复的配置类
   configurations = removeDuplicates(configurations);
    //执行
   Set<String> exclusions = getExclusions(annotationMetadata, attributes);
    //校验
   checkExcludedClasses(configurations, exclusions);
    //删除
   configurations.removeAll(exclusions);
    //过滤
   configurations = getConfigurationClassFilter().filter(configurations);
   fireAutoConfigurationImportEvents(configurations, exclusions);
    //创建自动配置的对象
   return new AutoConfigurationEntry(configurations, exclusions);
}
第一步判断自动装配开关是否打开:默认spring.boot.enableautoconfiguration = true,可在application.properties或application.yml中设置
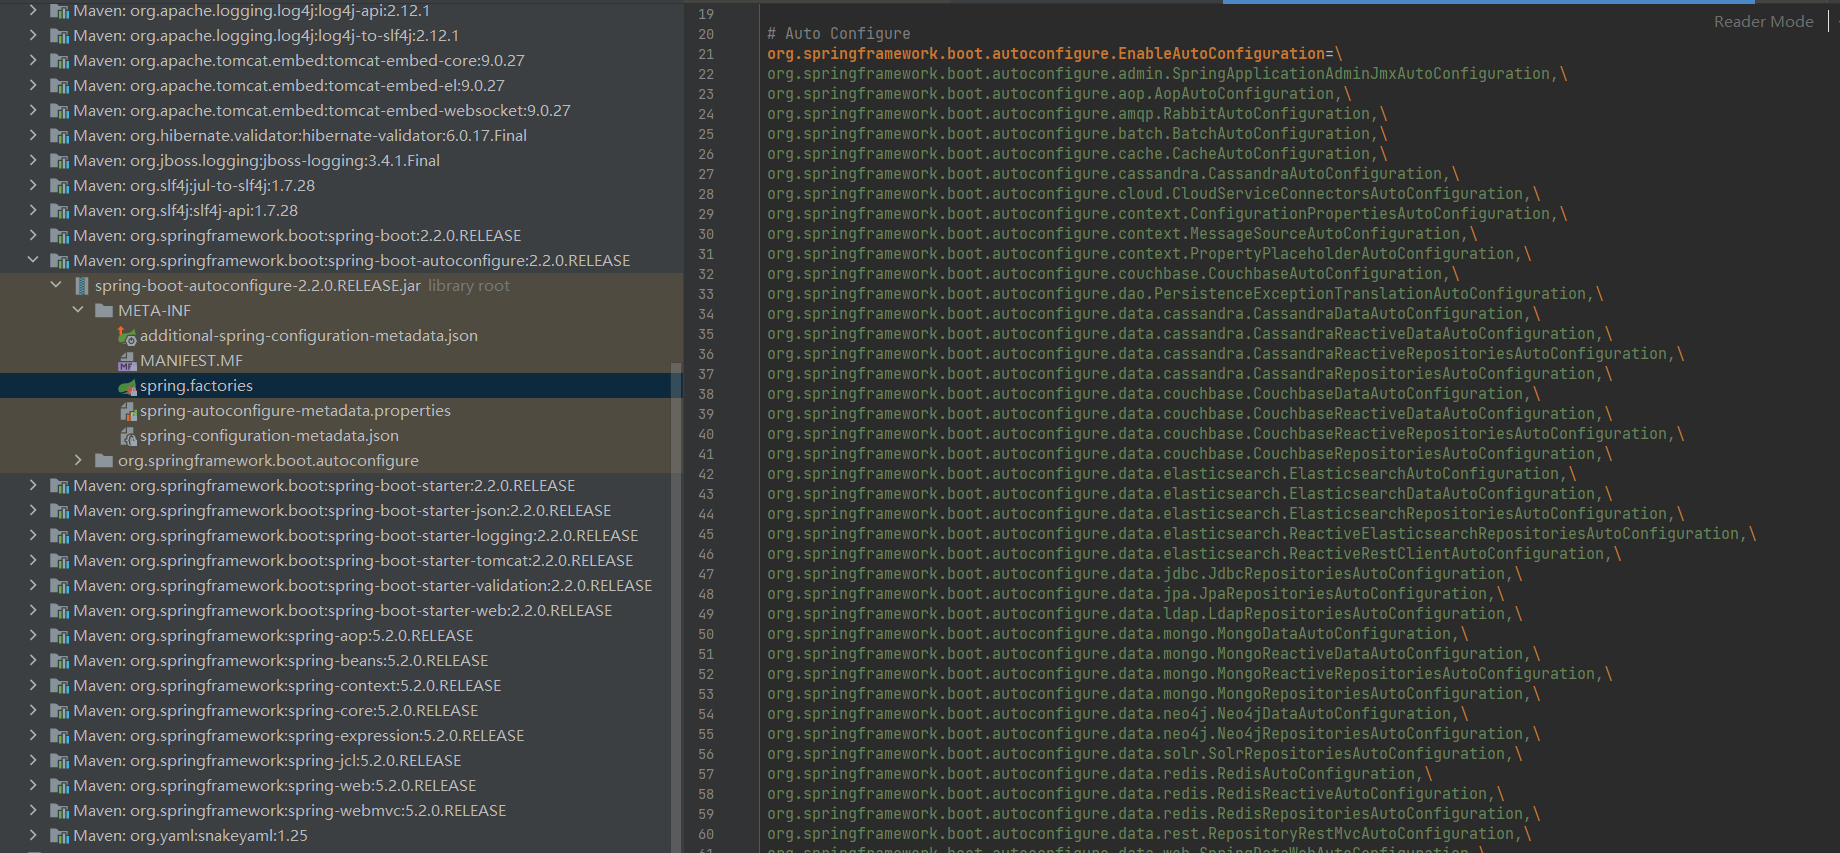
spring.factories中为Spring官方提供的所有自动配置类的候选列表,不光是这个依赖下的META-INF/spring.factories被读取到,所有Spring Boot Starter下的META-INF/spring.factories都会被读取到。
这些自动配置类并不是一定会生效,而是要符合一定的条件,而条件就是根据自动配置类上的@ConditionOnXXX来判断,只有所有注解都满足条件,则这个类才会生效。
Spring Boot 提供的条件注解如下:
@ConditionalOnBean:当容器里有指定 Bean 的条件下@ConditionalOnMissingBean:当容器里没有指定 Bean 的情况下@ConditionalOnSingleCandidate:当指定 Bean 在容器中只有一个,或者虽然有多个但是指定首选 Bean@ConditionalOnClass:当类路径下有指定类的条件下@ConditionalOnMissingClass:当类路径下没有指定类的条件下@ConditionalOnProperty:指定的属性是否有指定的值@ConditionalOnResource:类路径是否有指定的值@ConditionalOnExpression:基于 SpEL 表达式作为判断条件@ConditionalOnJava:基于 Java 版本作为判断条件@ConditionalOnJndi:在 JNDI 存在的条件下差在指定的位置@ConditionalOnNotWebApplication:当前项目不是Web项目的条件下@ConditionalOnWebApplication:当前项目是Web项目的条件下
可以在Springboot配置文件中加入debug: true来开启调试日志,确定有哪些AutoConfiguration生效,日志信息主要包括以下
- Positive matches:自动配置类启用的
- Negative matches:没有启动
- Exclusions:被排除的
- Unconditional classes:没有限定条件的
SpringBoot启动大概流程 #
Application.run(),完成对Spring容器的初始化,并且开启启动类注解的功能@SpringBootApplication,最核心的就是自动装配功能- 当SpringBoot启动后,如果
spring.boot.enableautoconfiguration = true,则开始执行自动装配 - 扫描所有
classpath://META-INF/spring.factories,获取所有自动配置类 - 根据自动配置类(AutoConfiguration)上的注解
@ConditionalXXX过滤出需要加载的自动配置类,并进行加载 - 需要加载的自动配置类注入Spring容器后,开始根据类上的注解例如:
@EnableConfigurationProperties、@ComponentScan,读取配置文件、加载Bean等,完成模块功能
自定义场景启动器 #
命名规范 #
官方定义的场景启动器命名格式为:spring-boot-starter-xxx,例如spring-boot-starter-web
自定义或第三方的场景启动器命名格式为:xxx-spring-boot-starter,例如mybatis-spring-boot-starter
自定义接口监听模块 #
该自定义模块要实现引入后自动在控制台输出接口调用情况
1、创建maven项目mylistener-spring-boot-starter
2、引入依赖
<?xml version="1.0" encoding="UTF-8"?>
<project xmlns="http://maven.apache.org/POM/4.0.0"
         xmlns:xsi="http://www.w3.org/2001/XMLSchema-instance"
         xsi:schemaLocation="http://maven.apache.org/POM/4.0.0 http://maven.apache.org/xsd/maven-4.0.0.xsd">
    <modelVersion>4.0.0</modelVersion>

    <groupId>top.ygang</groupId>
    <artifactId>mylistener-spring-boot-starter</artifactId>
    <version>1.0-SNAPSHOT</version>
    <packaging>jar</packaging>
    <parent>
        <artifactId>spring-boot-starter-parent</artifactId>
        <groupId>org.springframework.boot</groupId>
        <version>2.2.0.RELEASE</version>
    </parent>

    <properties>
        <maven.compiler.source>8</maven.compiler.source>
        <maven.compiler.target>8</maven.compiler.target>
    </properties>

    <dependencies>
        <!--  包含很多与自动配置相关的注解的定义,必须要引入  -->
        <dependency>
            <groupId>org.springframework.boot</groupId>
            <artifactId>spring-boot-autoconfigure</artifactId>
        </dependency>
        <!-- 编写自定义配置类需要 -->
        <dependency>
            <groupId>org.springframework.boot</groupId>
            <artifactId>spring-boot-configuration-processor</artifactId>
            <optional>true</optional>
        </dependency>
        <!-- 功能需要 -->
        <dependency>
            <groupId>org.springframework.boot</groupId>
            <artifactId>spring-boot-starter-aop</artifactId>
        </dependency>
    </dependencies>

</project>
3、创建配置类读取配置文件
@Component
@ConfigurationProperties(prefix = "mylistener")
public class MylistenerProperties {
    /**
     * 输出日期格式
     */
    private String dateformat = "yyyy-MM-dd HH:mm:ss";

    public String getDateformat() {
        return dateformat;
    }

    public void setDateformat(String dateformat) {
        this.dateformat = dateformat;
    }
}
4、创建切面类,监听所有GET方法
@Aspect
@Component
public class GetAdvice {

    public GetAdvice() {
        System.out.println("GetAdvice加载进入IOC容器!!!");
    }

    @Autowired
    private MylistenerProperties mylistenerProperties;

    @Pointcut("@annotation(org.springframework.web.bind.annotation.GetMapping)")
    public void pc(){}

    @Before("pc()")
    public void before(JoinPoint jp){
        SimpleDateFormat dateFormat = new SimpleDateFormat(mylistenerProperties.getDateformat());
        MethodSignature signature = (MethodSignature) jp.getSignature();
        Method method = signature.getMethod();
        System.out.println(dateFormat.format(new Date()) + " 方法:" + method.getName() + "被执行!!!");
    }
}
5、创建自动装配类,完成自动装配
@Configuration
// 限定自动装配类生效条件:当为Web应用时加载
@ConditionalOnWebApplication
// 加载配置文件,并注入Bean到容器
@EnableConfigurationProperties({
        MylistenerProperties.class
})
// 扫描所有切面,注入Spring容器
@ComponentScan("top.ygang.mylistener.advice")
public class MylistenerAutoConfiguration {

}
6、在resources目录下创建META-INF/spring.factories文件,使SpringBoot可以找到自动装配类
org.springframework.boot.autoconfigure.EnableAutoConfiguration=\
top.ygang.mylistener.MylistenerAutoConfiguration
7、打包、安装:mvn clean install
8、在上面的Hello World项目中,引入模块组件
<dependency>
    <groupId>top.ygang</groupId>
    <artifactId>mylistener-spring-boot-starter</artifactId>
    <version>1.0-SNAPSHOT</version>
</dependency>
9、启动项目,由于已经在配置文件中配置了:debug: true,所以可以看到所有AutoConfiguration的加载情况,可以看到模块组件已经被加载

10、调用接口http://localhost:8080/helloworld,看到控制台输出

常见问题 #
mybatis无法找到xml映射文件 #
此时分为两种情况,一种是xml映射文件没有和mapper接口放在一起,而是单独放在别的目录,例如resouces下,可以通过mybatis配置项进行配置
mybatis:
  mapper-locations: classpath*:/mapper/**/*.xml
另一种情况是,SpringBoot项目打jar包后,没有将xml文件打进jar,可以通过pom.xml配置
<build>
    <resources>
        <resource>
            <directory>src/main/java</directory>
            <includes>
                <include>**/*.xml</include>
            </includes>
        </resource>
        <resource>
            <directory>src/main/resources</directory>
        </resource>
    </resources>
</build>
配置文件中密码加密 #
Spring Boot中使用ENC(Environment-Neutral Configuration)主要是为了将配置信息从应用程序代码中分离出来,以提高安全性和可维护性。ENC的主要优点包括:
- 安全性增强: 敏感信息(如数据库密码、API密钥等)不应硬编码在代码中,而是应该使用加密的方式存储在配置文件中,然后通过ENC进行解密和使用,从而减少泄露风险。
- 可维护性: 将配置信息与代码分离,使得配置可以独立地修改和管理,而不需要重新编译和部署应用程序。这样可以降低维护成本,并使应用程序更易于管理。
- 灵活性: 使用ENC可以根据不同的环境(开发、测试、生产等)提供不同的配置,而不需要修改应用程序代码,从而提高了部署的灵活性和可移植性。
pmo.xml依赖
<dependency>
    <groupId>com.github.ulisesbocchio</groupId>
    <artifactId>jasypt-spring-boot-starter</artifactId>
    <version>3.0.5</version>
</dependency>
配置加密盐值
jasypt:
  encryptor:
  	# password值任意,最好随机字符
    password: hhX4FzbwcT
工具类使用
import org.jasypt.encryption.pbe.StandardPBEStringEncryptor;

public class JasyptTest {

    /**
     * 加密盐值,使用完成后进行删除,或者不能提交到`生产环境`,比如:
     */
    private final static String PASSWORD = "hhX4FzbwcT";


    public static void main(String[] args) {

        PooledPBEStringEncryptor encryptor = new PooledPBEStringEncryptor();

        SimpleStringPBEConfig config = new SimpleStringPBEConfig();
        // 用于设置加密密钥。密钥是用于加密和解密字符串的关键信息。
        config.setPassword(PASSWORD);
        // 加密算法的名称,jasypt-3.0.5版本后默认的加密方式
        config.setAlgorithm("PBEWITHHMACSHA512ANDAES_256");
        // 用于设置加密时迭代次数的数量,增加迭代次数可以使攻击者更难进行密码破解。
        config.setKeyObtentionIterations("1000");
        // 加密器池的大小。池是一组加密器实例,可确保加密操作的并发性。
        config.setPoolSize("1");
        // 用于设置JCE(Java Cryptography Extension)提供程序的名称。
        config.setProviderName("SunJCE");
        // 用于设置生成盐的类名称。在此配置中,我们使用了org.jasypt.salt.RandomSaltGenerator,表示使用随机生成的盐。
        config.setSaltGeneratorClassName("org.jasypt.salt.RandomSaltGenerator");
        // 用于设置Jasypt使用的初始化向量(IV)生成器的类名。初始化向量是在加密过程中使用的一个固定长度的随机数,用于加密数据块,使每个数据块的加密结果都是唯一的。在此配置中,我们使用了org.jasypt.iv.RandomIvGenerator类,该类是一个随机生成器,用于生成实时随机IV的实例。这样可以确保每次加密的IV都是唯一的,从而增加加密强度。
        config.setIvGeneratorClassName("org.jasypt.iv.RandomIvGenerator");
        // 指定加密输出类型。在此配置中,我们选择了base64输出类型。
        config.setStringOutputType("base64");
        encryptor.setConfig(config);

        // 明文1
        String name_encrypt = "root";
        // 明文2
        String password_encrypt = "123456";

        // 明文加密
        String encrypt1 = encryptor.encrypt(name_encrypt);
        String encrypt2 = encryptor.encrypt(password_encrypt);
        System.out.println("明文加密1:" + encrypt1);
        System.out.println("明文加密2:" + encrypt2);

        // 密文解密
        String decrypt1 = encryptor.decrypt(encrypt1);
        String decrypt2 = encryptor.decrypt(encrypt2);
        System.out.println("密文解密1:" + decrypt1);
        System.out.println("密文解密2:" + decrypt2);
    }
}
加密配置使用
sys:
 name: ENC(Yt36hceu3xGXEzrz2jCPjvalaXQ5yIHE04SVT6lIkcktrxqtBZrlivkAkA9/9oZ2)
 password: ENC(0Ci6irPOko9IG+hBZJAGoguIuE52gF/XiigCV4DwLm6NfkoyvV4Etgc9FzKK3MYl)
测试
@RestController
public class TestController {

    @Value("${sys.name}")
    private String name;

    @Value("${sys.password}")
    private String password;

    @GetMapping("/test")
    public void test() {
        System.out.println("name = " + name);
        System.out.println("password = " + password);
    }
}
原理
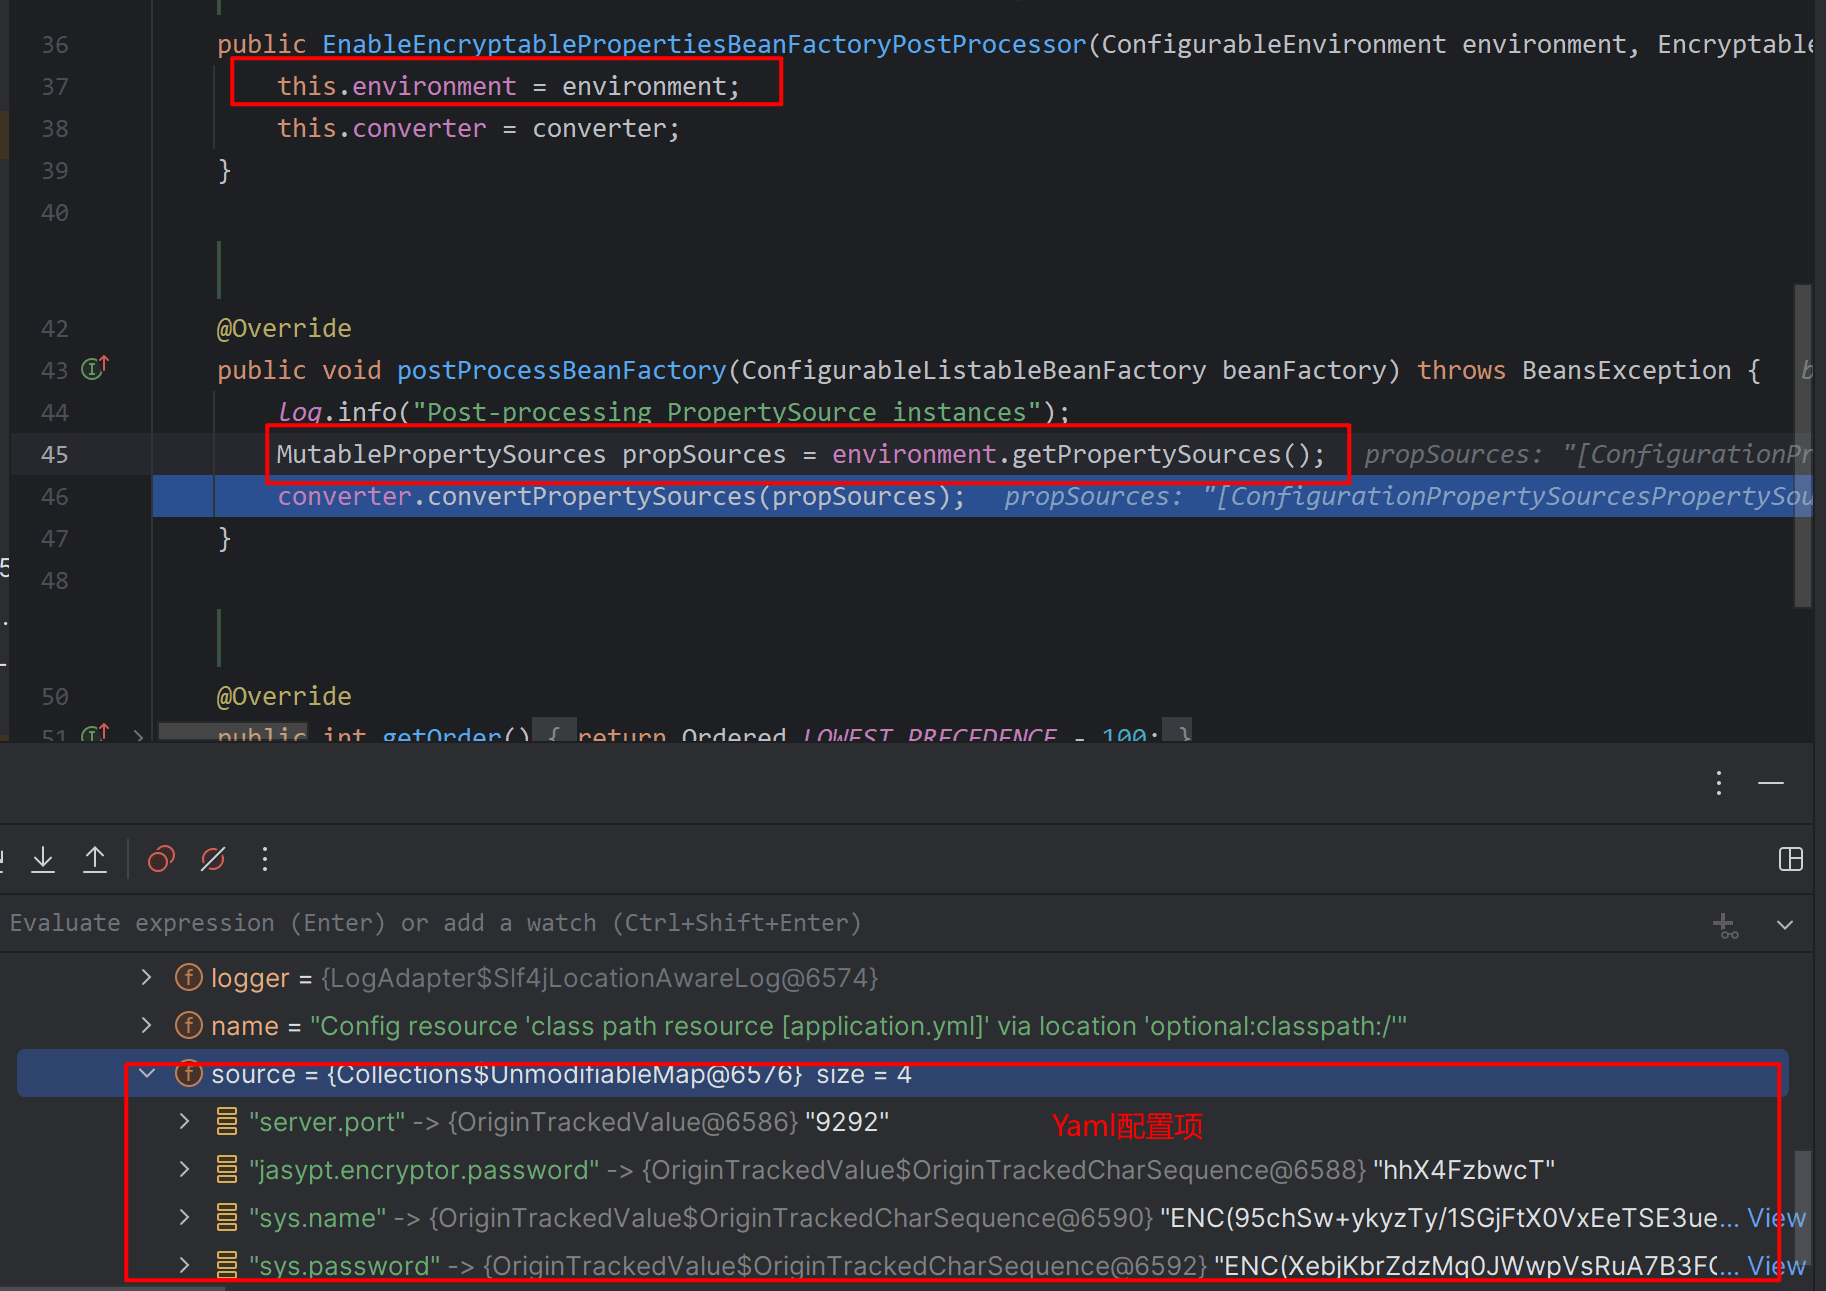
1、在jasypt-spring-boot-starter包的自动配置类JasyptSpringBootAutoConfiguration中通过@Import注解引入了EnableEncryptablePropertiesConfiguration配置类,该类中environment参数储存了yaml文件元数据;
2、在postProcessBeanFactory方法中,调用environment.getPropertySources()方法获取yaml配置项目;
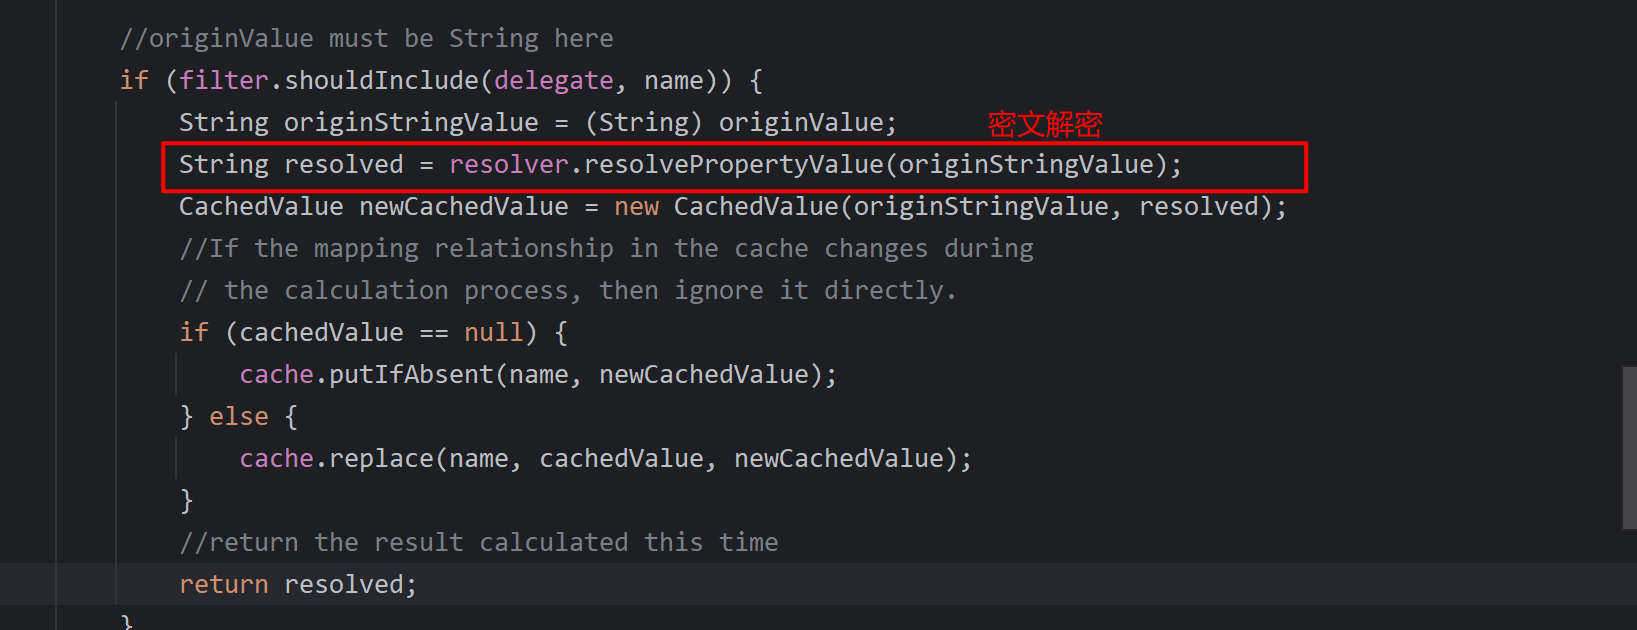
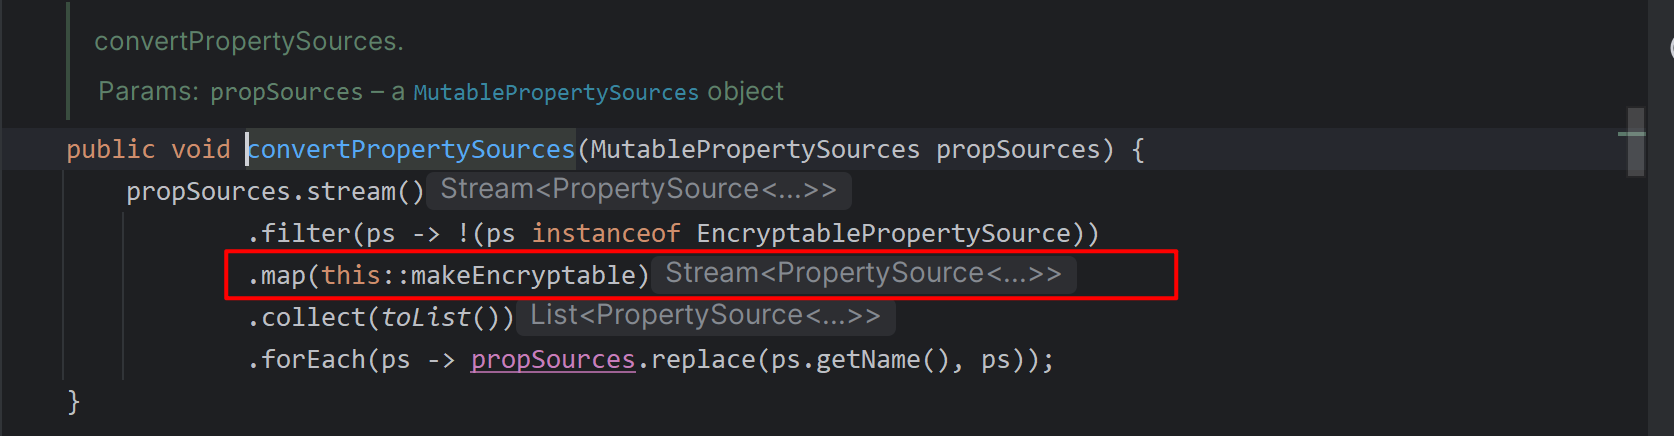
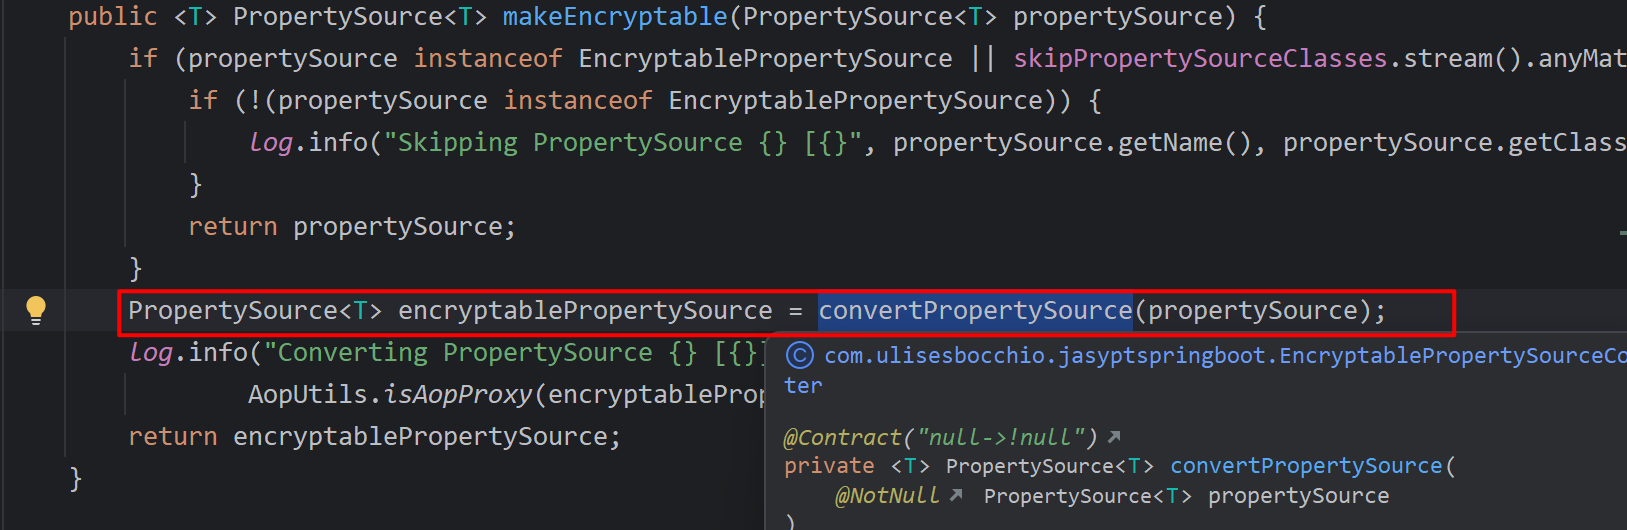
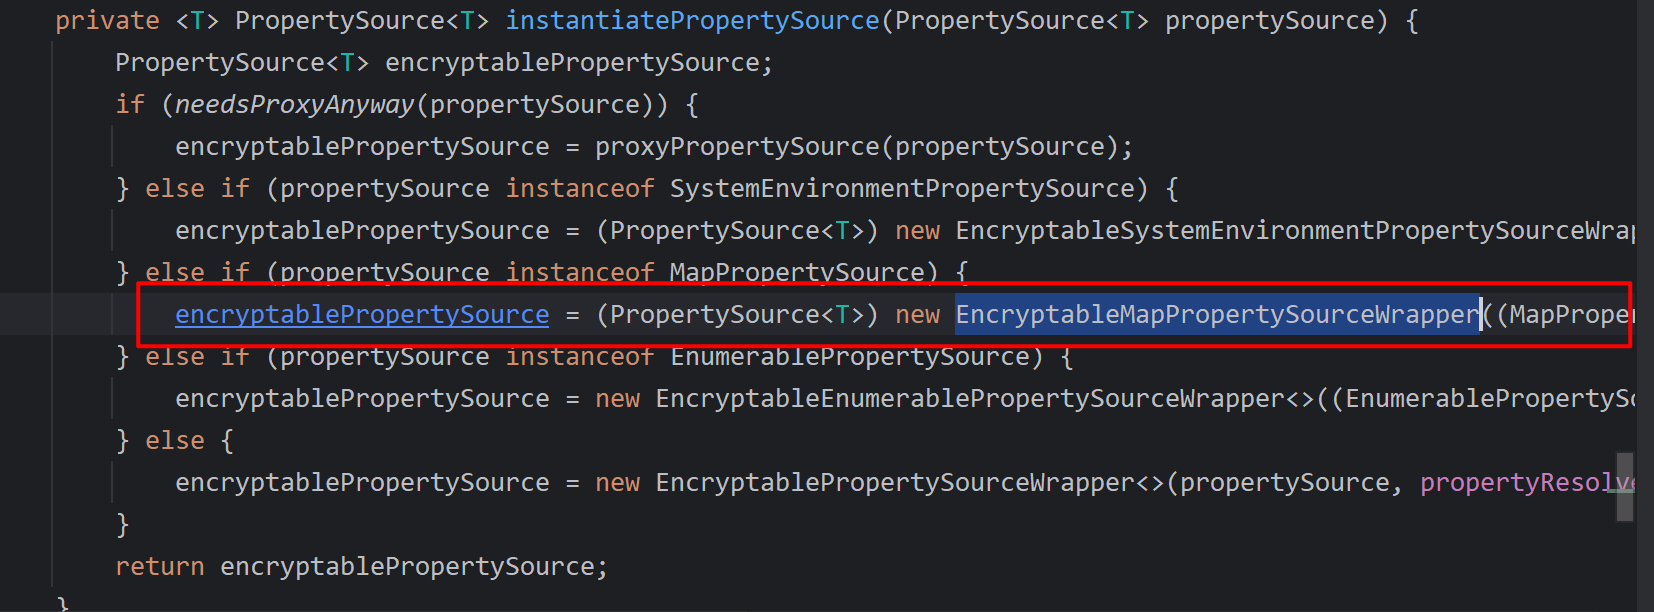
3、通过convertPropertySources进行数据转换,修改yaml中配置项值,具体实现为调用instantiatePropertySource()方法,在该方法中,匹配propertySource instanceof MapPropertySource,转化为EncryptableMapPropertySourceWrapper对象;


4、EncryptableMapPropertySourceWapper类中,通过getProperty(name)方法进行匹配,匹配成功后调用resolver.resolvePropertyValue进行ENC配置的解密并且替换原有的propertySource值;