Spring Boot
概念
Spring Boot 基于 Spring 开发,Spirng Boot 本身并不提供 Spring 框架的核心特性以及扩展功能,只是用于快速、敏捷地开发新一代基于 Spring 框架的应用程序。也就是说,它并不是用来替代 Spring 的解决方案,而是和 Spring 框架紧密结合用于提升 Spring 开发者体验的工具。Spring Boot 以约定大于配置的核心思想,默认帮我们进行了很多设置,多数 Spring Boot 应用只需要很少的 Spring 配置。同时它集成了大量常用的第三方库配置(例如 Redis、MongoDB、Jpa、RabbitMQ、Quartz 等等),Spring Boot 应用中这些第三方库几乎可以零配置的开箱即用。
特征
- 为所有Spring开发者更快的入门
- 开箱即用,提供各种默认配置来简化项目配置
- 内嵌式Servlet容器(Tomcat、Jetty 或者 Undertow)简化Web项目
- 没有冗余代码生成和XML配置的要求
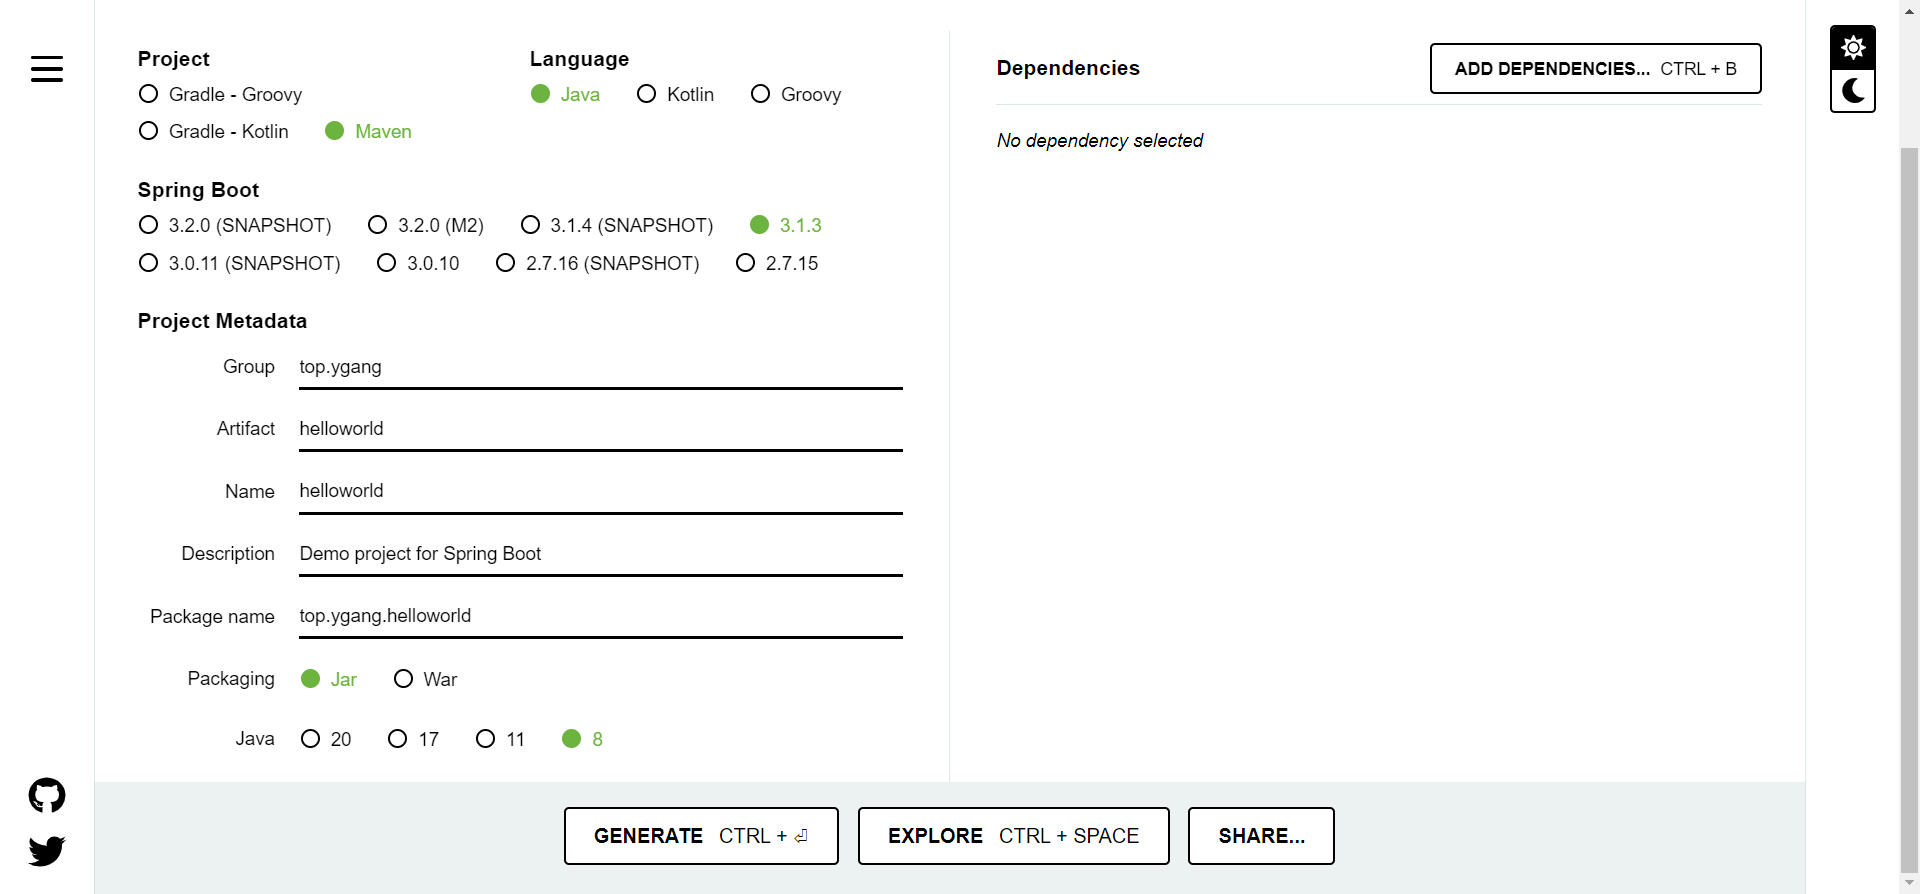
Spring Initializr
Spring官方提供了Spring Initializr:https://start.spring.io/,帮助快速的搭建Spring Boot工程
Hello World
pom.xml
<?xml version="1.0" encoding="UTF-8"?>
<project xmlns="http://maven.apache.org/POM/4.0.0"
         xmlns:xsi="http://www.w3.org/2001/XMLSchema-instance"
         xsi:schemaLocation="http://maven.apache.org/POM/4.0.0 http://maven.apache.org/xsd/maven-4.0.0.xsd">
    <modelVersion>4.0.0</modelVersion>

    <groupId>top.ygang</groupId>
    <artifactId>springboot-demo</artifactId>
    <version>1.0-SNAPSHOT</version>
    <packaging>jar</packaging>

    <!--  一般情况下使用Springboot官方提供的启动器父依赖统一管理springboot各组件版本  -->
    <parent>
        <groupId>org.springframework.boot</groupId>
        <artifactId>spring-boot-starter-parent</artifactId>
        <version>2.7.5</version>
    </parent>

    <properties>
        <maven.compiler.source>8</maven.compiler.source>
        <maven.compiler.target>8</maven.compiler.target>
    </properties>

    <dependencies>
        <!--   web场景启动器    -->
        <dependency>
            <groupId>org.springframework.boot</groupId>
            <artifactId>spring-boot-starter-web</artifactId>
        </dependency>
    </dependencies>

    <build>
        <plugins>
            <!--  springboot打包插件  -->
            <plugin>
                <groupId>org.springframework.boot</groupId>
                <artifactId>spring-boot-maven-plugin</artifactId>
            </plugin>
        </plugins>
    </build>
</project>
启动类
package top.ygang.springbootdemo;

import org.springframework.boot.SpringApplication;
import org.springframework.boot.autoconfigure.SpringBootApplication;

@SpringBootApplication
public class ApplicationStart {

    public static void main(String[] args) {
        SpringApplication.run(ApplicationStart.class,args);
    }
}
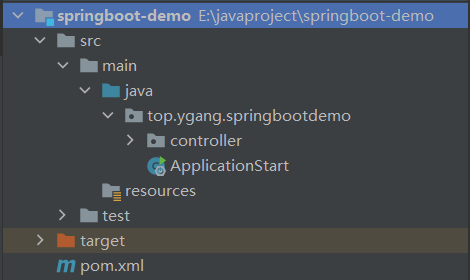
注意:启动类一般要放在工程的顶级目录中(相对于其他类)
Controller
package top.ygang.springbootdemo.controller;

import org.springframework.web.bind.annotation.GetMapping;
import org.springframework.web.bind.annotation.RestController;

@RestController
public class DemoController {

    @GetMapping("/helloworld")
    public String helloworld(){
        return "Hello Spring Boot!";
    }
}
访问
spring-boot-starter-web的默认端口为:8080

SpringBoot配置文件
Springboot默认的配置文件名为:application.yml或application.properties
application.properties
#端口号
server.port=8080
#项目名,可以不写,默认localhost:8080就可以访问项目
server.servlet.context-path=/app
#配置静态资源访问路径,resources文件夹下
spring.resources.static-locations=classpath:/templates/

#前缀后缀
spring.mvc.view.prefix=/
spring.mvc.view.suffix=.jsp

#数据库连接池
spring.datasource.type=com.alibaba.druid.pool.DruidDataSource
# spring.datasource.driverClassName=org.postgresql.Driver
# 初始化时建立物理连接的个数
spring.datasource.druid.initial-size=5
# 最小连接池数量
spring.datasource.druid.min-idle=5
# 最大连接池数量
spring.datasource.druid.max-active=20
# 获取连接时最大等待时间,单位毫秒
spring.datasource.druid.max-wait=60000
# 申请连接的时候检测,如果空闲时间大于timeBetweenEvictionRunsMillis,执行validationQuery检测连接是否有效。
spring.datasource.druid.test-while-idle=true
# 既作为检测的间隔时间又作为testWhileIdel执行的依据
spring.datasource.druid.time-between-eviction-runs-millis=60000
# 销毁线程时检测当前连接的最后活动时间和当前时间差大于该值时,关闭当前连接
spring.datasource.druid.min-evictable-idle-time-millis=30000
spring.datasource.url=jdbc:mysql://localhost:3306/mana?useUnicode=true&characterEncoding=utf8&serverTimezone=Asia/Shanghai&useSSL=false
spring.datasource.username=root
spring.datasource.password=123456
spring.datasource.driverClassName=com.mysql.cj.jdbc.Driver

#redis配置
spring.redis.host = localhost
spring.redis.password = eduask
spring.redis.port = 6379

#分页拦截器,为true先设定数据库中查询的范围,再根据条件查询
pagehelper.reasonable=false

#mapper.xml扫描,如果mapper.xml和mapper.java在一个包里,那么注解MapperScan就可以了
mybatis.mapper-locations=classpath*:top.ygang.mapper/*.xml
YML
全名**:YAML Ain't Markup Language**
以数据为中心,比json、xml等更适合做配置文件
基本语法
key:[空格]value:表示一对键值对(空格必须有)- 以**空格的缩进(不可以使用TAB缩进)**来控制层级关系,只要是左对齐的一列数据,都是同一个层级的
- 属性和值也是大小写敏感
值的写法
字面量
- 普通的值(数字,字符串,布尔)
k: v:字面直接来写;- 字符串默认不用加上单引号或者双引号
"":双引号;不会转义字符串里面的特殊字符;特殊字符会作为本身想表示的意思- name:
"zhangsan \n lisi" - 输出:
zhangsan 换行 lisi
- name:
'':单引号;会转义特殊字符,特殊字符最终只是一个普通的字符串数据- name:
'zhangsan \n lisi' - 输出:
zhangsan \n lisi
- name:
对象、Map
在下一行来写对象的属性和值的关系;注意缩进
friends:
   lastName: zhangsan
   age: 20
#行内写法:
friends: {lastName: zhangsan,age: 18}
数组、集合(List、Set)
用- value表示数组中的一个元素
pets:
  - cat
  - dog
  - pig
application.yml文件
#端口号
server:
   port: 8080
   servlet:
      context-path: /app

#配置thymeleaf的视图解析器ThymeleafViewResolver
spring:
   thymeleaf:
      prefix: classpath:/templates/
      suffix: .html
      mode: HTML5
      cache: false
      encoding: UTF-8

   #redis配置
   redis:
      host: localhost
      password: eduask
      port: 6379

   #数据库配置
   datasource:
      type: com.alibaba.druid.pool.DruidDataSource
      driver-class-name: com.mysql.cj.jdbc.Driver
      url: jdbc:mysql://localhost:3306/manage?useUnicode=true&characterEncoding=utf8&serverTimezone=Asia/Shanghai&useSSL=false
      username: root
      password: 123456
      #数据库连接池
      druid:
         # 初始化时建立物理连接的个数
         initial-size: 5
         # 最小连接池数量
         min-idle: 5
         # 最大连接池数量
         max-active: 20
         # 获取连接时最大等待时间,单位毫秒
         max-wait: 60000
         # 申请连接的时候检测,如果空闲时间大于timeBetweenEvictionRunsMillis,执行validationQuery检测连接是否有效。
         test-while-idle: true
         # 既作为检测的间隔时间又作为testWhileIdel执行的依据
         time-between-eviction-runs-millis: 60000
         #销毁线程时检测当前连接的最后活动时间和当前时间差大于该值时,关闭当前连接
         min-evictable-idle-time-millis: 30000
   servlet:
      #文件上传配置
      multipart:
         enabled: true
         #单个文件的大小
         max-file-size: 20MB
         #限制总上传文件的大小
         max-request-size: 20MB

#分页拦截器
pagehelper:
   reasonable: false

#日志
logging:
  level:
    root: info
    top.ygang: debug
    org.springframework.security: warn
区分开发和生产环境配置文件
在resource下新建三个配置文件:application.yml(通用),application-dev.yml(开发),application-prod.yml(生产)
使用方式1,在application.yml中指定当前使用的配置文件类型
spring:
  profiles:
    active: dev
使用方式2,在jar包启动的使用,添加命令,指定使用的配置文件类型
java -jar test.jar --spring.profiles.active=dev
读取配置文件的信息
1、读取单个参数
spring:
  application:
    name: test
在java bean代码中读取name属性值,使用@Value注解
@Value("${spring.application.name}")
private String name;
2、读取同一节点下的多个属性(对象)
minio:
  endpoint: localhost:9000
  accesskey: minioadmin
  secretkey: minioadmin
使用@ConfigurationProperties的配置类用于读取配置文件,在spring容器启动时,就会在yml中读取
@Component
@Data
@ConfigurationProperties(prefix = "minio")
public class MinioConfig{
    private String endpoint;
    private String accesskey;
    private String secretkey;
}
spring-boot-configuration-processor
有的时候,我们自己开发一个模块,希望我们的Bean对应的配置文件项会有提示,例如

就可以引入该依赖,搭配注解@ConfigurationProperties使用
<dependency>
    <groupId>org.springframework.boot</groupId>
    <artifactId>spring-boot-configuration-processor</artifactId>
    <optional>true</optional>
</dependency>
引入后,要求Bean必须添加@Component注解,并且属性必须有public的getter、setter,例如
@ConfigurationProperties(prefix = "student")
@Component
public class Student {
    /**
     * 编号
     */
    private String id = "001";
    /**
     * 姓名
     */
    private String name = "lucy";

    public String getId() {
        return id;
    }

    public void setId(String id) {
        this.id = id;
    }

    public String getName() {
        return name;
    }

    public void setName(String name) {
        this.name = name;
    }
}
然后就可以build project,会在target/classes/META-INF目录下生成spring-configuration-metadata.json文件,里面有对改配置项的说明
{
  "groups": [
    {
      "name": "student",
      "type": "top.ygang.springbootdemo.Student",
      "sourceType": "top.ygang.springbootdemo.Student"
    }
  ],
  "properties": [
    {
      "name": "student.id",
      "type": "java.lang.String",
      "description": "编号",
      "sourceType": "top.ygang.springbootdemo.Student"
    },
    {
      "name": "student.name",
      "type": "java.lang.String",
      "description": "姓名",
      "sourceType": "top.ygang.springbootdemo.Student"
    }
  ],
  "hints": []
}
场景启动器
解决的问题
在SpringBoot出现之前,如果我们想使用SpringMVC来构建我们的web项目,必须要做的几件事情如下:
- 首先项目中需要引入SpringMVC的依赖
- 在web.xml中注册SpringMVC的
DispatcherServlet,并配置url映射 - 编写
springmcv-servlet.xml,在其中配置SpringMVC中几个重要的组件,处理映射器(HandlerMapping)、处理适配器(HandlerAdapter)、视图解析器(ViewResolver) - 在
applicationcontext.xml文件中引入springmvc-servlet.xml文件 - …
以上这几步只是配置好了SpringMVC,如果我们还需要与数据库进行交互,就要在application.xml中配置数据库连接池DataSource,如果需要数据库事务,还需要配置TransactionManager…
这就是使用Spring框架开发项目带来的一些的问题:
- 依赖导入问题: 每个项目都需要来单独维护自己的依赖,在项目中使用到什么功能就需要引入什么样的依赖。手动导入依赖容易出错,且无法统一集中管理
- 配置繁琐: 在引入依赖之后需要做繁杂的配置,并且这些配置是每个项目来说都是必要的,例如web.xml配置(Listener配置、Filter配置、Servlet配置)、log4j配置、数据库连接池配置等等。这些配置重复且繁杂,在不同的项目中需要进行多次重复开发,这在很大程度上降低了我们的开发效率
而在SpringBoot出现之后,它为我们提供了一个强大的功能来解决上述的两个痛点,这就是SpringBoot的starters(场景启动器)。
Spring Boot通过将我们常用的功能场景抽取出来,做成的一系列场景启动器,这些启动器帮我们导入了实现各个功能所需要依赖的全部组件,我们只需要在项目中引入这些starters,相关场景的所有依赖就会全部被导入进来,并且我们可以抛弃繁杂的配置,仅需要通过配置文件来进行少量的配置就可以使用相应的功能。
原理
在导入的starter之后,SpringBoot主要帮我们完成了两件事情
- 相关组件的自动导入
- 相关组件的自动配置
SpringApplication.run()
SpringApplication.run()方法主要完成了以下功能:
- 创建SpringApplication对象;在对象初始化时保存事件监听器,容器初始化类以及判断是否为web应用,保存包含main方法的主配置类。
- 调用run方法;准备spring的上下文,完成容器的初始化,创建,加载等。会在不同的时机触发监听器的不同事件。
@SpringBootApplication
这个注解作为一个Springboot工程的开始,也是Springboot的核心注解,它有如下两个核心的元注解
@Target({ElementType.TYPE})
@Retention(RetentionPolicy.RUNTIME)
@Documented
@Inherited
@SpringBootConfiguration
@EnableAutoConfiguration
@ComponentScan(
    excludeFilters = {@Filter(
    type = FilterType.CUSTOM,
    classes = {TypeExcludeFilter.class}
), @Filter(
    type = FilterType.CUSTOM,
    classes = {AutoConfigurationExcludeFilter.class}
)}
)
public @interface SpringBootApplication {}
@SpringBootConfiguration
这个注解有一个元注解@Configuration,也就是标志了这个类是一个配置类,并且注入Spring容器进行管理
@EnableAutoConfiguration
这个注解是Springboot开启自动配置的核心注解
@Target({ElementType.TYPE})
@Retention(RetentionPolicy.RUNTIME)
@Documented
@Inherited
@AutoConfigurationPackage
@Import({AutoConfigurationImportSelector.class})
public @interface EnableAutoConfiguration {
    String ENABLED_OVERRIDE_PROPERTY = "spring.boot.enableautoconfiguration";

    Class<?>[] exclude() default {};

    String[] excludeName() default {};
}
@AutoConfigurationPackage的作用是将main包下的所有组件注册进容器@Import({AutoConfigurationImportSelector.class})的作用是加载自动装配类:AutoConfigurationImportSelector,自动装配的核心功能也就是通过这个类实现的
AutoConfigurationImportSelector有一个关键的方法如下
protected AutoConfigurationEntry getAutoConfigurationEntry(AnnotationMetadata annotationMetadata) {
    //第1步:判断自动装配开关是否打开
   if (!isEnabled(annotationMetadata)) {
      return EMPTY_ENTRY;
   }
    //第2步:用于获取注解中的exclude和excludeName。
    //获取注解属性
   AnnotationAttributes attributes = getAttributes(annotationMetadata);
    //第3步:获取需要自动装配的所有配置类,读取META-INF/spring.factories
    //读取所有预配置类
   List<String> configurations = getCandidateConfigurations(annotationMetadata, attributes);
    //第4步:符合条件加载
    //去掉重复的配置类
   configurations = removeDuplicates(configurations);
    //执行
   Set<String> exclusions = getExclusions(annotationMetadata, attributes);
    //校验
   checkExcludedClasses(configurations, exclusions);
    //删除
   configurations.removeAll(exclusions);
    //过滤
   configurations = getConfigurationClassFilter().filter(configurations);
   fireAutoConfigurationImportEvents(configurations, exclusions);
    //创建自动配置的对象
   return new AutoConfigurationEntry(configurations, exclusions);
}
第一步判断自动装配开关是否打开:默认spring.boot.enableautoconfiguration = true,可在application.properties或application.yml中设置
spring.factories中为Spring官方提供的所有自动配置类的候选列表,不光是这个依赖下的META-INF/spring.factories被读取到,所有Spring Boot Starter下的META-INF/spring.factories都会被读取到。
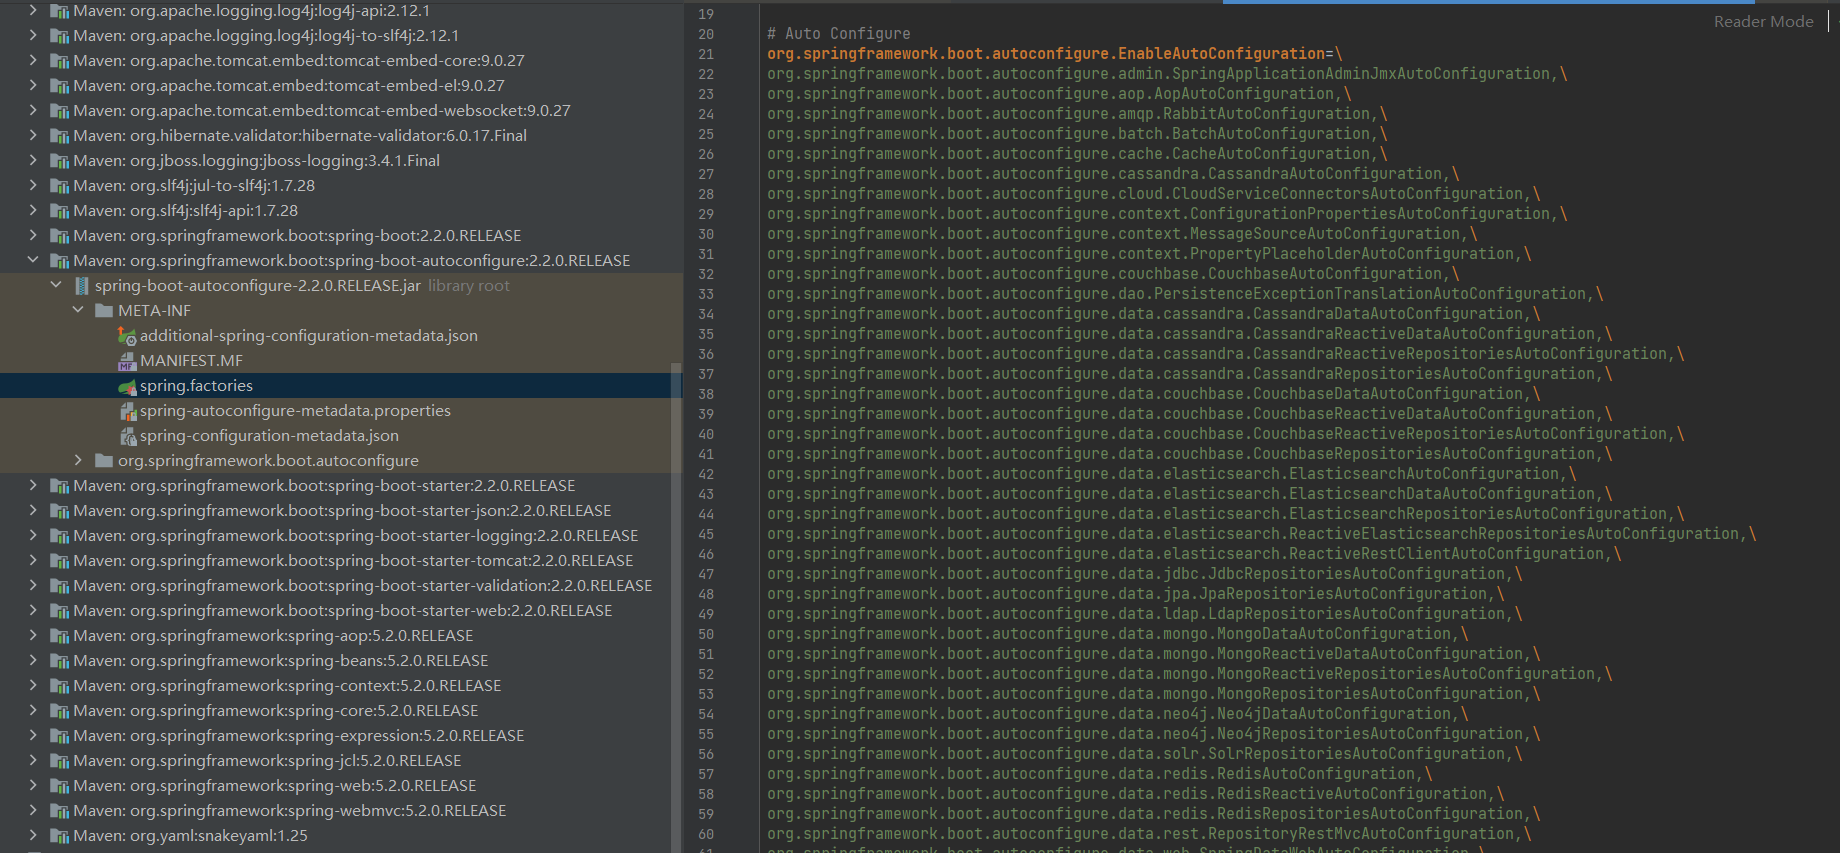
这些自动配置类并不是一定会生效,而是要符合一定的条件,而条件就是根据自动配置类上的@ConditionOnXXX来判断,只有所有注解都满足条件,则这个类才会生效。
Spring Boot 提供的条件注解如下:
@ConditionalOnBean:当容器里有指定 Bean 的条件下@ConditionalOnMissingBean:当容器里没有指定 Bean 的情况下@ConditionalOnSingleCandidate:当指定 Bean 在容器中只有一个,或者虽然有多个但是指定首选 Bean@ConditionalOnClass:当类路径下有指定类的条件下@ConditionalOnMissingClass:当类路径下没有指定类的条件下@ConditionalOnProperty:指定的属性是否有指定的值@ConditionalOnResource:类路径是否有指定的值@ConditionalOnExpression:基于 SpEL 表达式作为判断条件@ConditionalOnJava:基于 Java 版本作为判断条件@ConditionalOnJndi:在 JNDI 存在的条件下差在指定的位置@ConditionalOnNotWebApplication:当前项目不是Web项目的条件下@ConditionalOnWebApplication:当前项目是Web项目的条件下
可以在Springboot配置文件中加入debug: true来开启调试日志,确定有哪些AutoConfiguration生效,日志信息主要包括以下
- Positive matches:自动配置类启用的
- Negative matches:没有启动
- Exclusions:被排除的
- Unconditional classes:没有限定条件的
SpringBoot启动大概流程
Application.run(),完成对Spring容器的初始化,并且开启启动类注解的功能@SpringBootApplication,最核心的就是自动装配功能- 当SpringBoot启动后,如果
spring.boot.enableautoconfiguration = true,则开始执行自动装配 - 扫描所有
classpath://META-INF/spring.factories,获取所有自动配置类 - 根据自动配置类(AutoConfiguration)上的注解
@ConditionalXXX过滤出需要加载的自动配置类,并进行加载 - 需要加载的自动配置类注入Spring容器后,开始根据类上的注解例如:
@EnableConfigurationProperties、@ComponentScan,读取配置文件、加载Bean等,完成模块功能
自定义场景启动器
命名规范
官方定义的场景启动器命名格式为:spring-boot-starter-xxx,例如spring-boot-starter-web
自定义或第三方的场景启动器命名格式为:xxx-spring-boot-starter,例如mybatis-spring-boot-starter
自定义接口监听模块
该自定义模块要实现引入后自动在控制台输出接口调用情况
1、创建maven项目mylistener-spring-boot-starter
2、引入依赖
<?xml version="1.0" encoding="UTF-8"?>
<project xmlns="http://maven.apache.org/POM/4.0.0"
         xmlns:xsi="http://www.w3.org/2001/XMLSchema-instance"
         xsi:schemaLocation="http://maven.apache.org/POM/4.0.0 http://maven.apache.org/xsd/maven-4.0.0.xsd">
    <modelVersion>4.0.0</modelVersion>

    <groupId>top.ygang</groupId>
    <artifactId>mylistener-spring-boot-starter</artifactId>
    <version>1.0-SNAPSHOT</version>
    <packaging>jar</packaging>
    <parent>
        <artifactId>spring-boot-starter-parent</artifactId>
        <groupId>org.springframework.boot</groupId>
        <version>2.2.0.RELEASE</version>
    </parent>

    <properties>
        <maven.compiler.source>8</maven.compiler.source>
        <maven.compiler.target>8</maven.compiler.target>
    </properties>

    <dependencies>
        <!--  包含很多与自动配置相关的注解的定义,必须要引入  -->
        <dependency>
            <groupId>org.springframework.boot</groupId>
            <artifactId>spring-boot-autoconfigure</artifactId>
        </dependency>
        <!-- 编写自定义配置类需要 -->
        <dependency>
            <groupId>org.springframework.boot</groupId>
            <artifactId>spring-boot-configuration-processor</artifactId>
            <optional>true</optional>
        </dependency>
        <!-- 功能需要 -->
        <dependency>
            <groupId>org.springframework.boot</groupId>
            <artifactId>spring-boot-starter-aop</artifactId>
        </dependency>
    </dependencies>

</project>
3、创建配置类读取配置文件
@Component
@ConfigurationProperties(prefix = "mylistener")
public class MylistenerProperties {
    /**
     * 输出日期格式
     */
    private String dateformat = "yyyy-MM-dd HH:mm:ss";

    public String getDateformat() {
        return dateformat;
    }

    public void setDateformat(String dateformat) {
        this.dateformat = dateformat;
    }
}
4、创建切面类,监听所有GET方法
@Aspect
@Component
public class GetAdvice {

    public GetAdvice() {
        System.out.println("GetAdvice加载进入IOC容器!!!");
    }

    @Autowired
    private MylistenerProperties mylistenerProperties;

    @Pointcut("@annotation(org.springframework.web.bind.annotation.GetMapping)")
    public void pc(){}

    @Before("pc()")
    public void before(JoinPoint jp){
        SimpleDateFormat dateFormat = new SimpleDateFormat(mylistenerProperties.getDateformat());
        MethodSignature signature = (MethodSignature) jp.getSignature();
        Method method = signature.getMethod();
        System.out.println(dateFormat.format(new Date()) + " 方法:" + method.getName() + "被执行!!!");
    }
}
5、创建自动装配类,完成自动装配
@Configuration
// 限定自动装配类生效条件:当为Web应用时加载
@ConditionalOnWebApplication
// 加载配置文件,并注入Bean到容器
@EnableConfigurationProperties({
        MylistenerProperties.class
})
// 扫描所有切面,注入Spring容器
@ComponentScan("top.ygang.mylistener.advice")
public class MylistenerAutoConfiguration {

}
6、在resources目录下创建META-INF/spring-factories文件,使SpringBoot可以找到自动装配类
org.springframework.boot.autoconfigure.EnableAutoConfiguration=\
top.ygang.mylistener.MylistenerAutoConfiguration
7、打包、安装:mvn clean install
8、在上面的Hello World项目中,引入模块组件
<dependency>
    <groupId>top.ygang</groupId>
    <artifactId>mylistener-spring-boot-starter</artifactId>
    <version>1.0-SNAPSHOT</version>
</dependency>
9、启动项目,由于已经在配置文件中配置了:debug: true,所以可以看到所有AutoConfiguration的加载情况,可以看到模块组件已经被加载

10、调用接口http://localhost:8080/helloworld,看到控制台输出

常见问题
mybatis无法找到xml映射文件
此时分为两种情况,一种是xml映射文件没有和mapper接口放在一起,而是单独放在别的目录,例如resouces下,可以通过mybatis配置项进行配置
mybatis:
  mapper-locations: classpath*:/mapper/**/*.xml
另一种情况是,SpringBoot项目打jar包后,没有将xml文件打进jar,可以通过pom.xml配置
<build>
    <resources>
        <resource>
            <directory>src/main/java</directory>
            <includes>
                <include>**/*.xml</include>
            </includes>
        </resource>
        <resource>
            <directory>src/main/resources</directory>
        </resource>
    </resources>
</build>
配置文件中密码加密
Spring Boot中使用ENC(Environment-Neutral Configuration)主要是为了将配置信息从应用程序代码中分离出来,以提高安全性和可维护性。ENC的主要优点包括:
- 安全性增强: 敏感信息(如数据库密码、API密钥等)不应硬编码在代码中,而是应该使用加密的方式存储在配置文件中,然后通过ENC进行解密和使用,从而减少泄露风险。
- 可维护性: 将配置信息与代码分离,使得配置可以独立地修改和管理,而不需要重新编译和部署应用程序。这样可以降低维护成本,并使应用程序更易于管理。
- 灵活性: 使用ENC可以根据不同的环境(开发、测试、生产等)提供不同的配置,而不需要修改应用程序代码,从而提高了部署的灵活性和可移植性。
pmo.xml依赖
<dependency>
    <groupId>com.github.ulisesbocchio</groupId>
    <artifactId>jasypt-spring-boot-starter</artifactId>
    <version>3.0.5</version>
</dependency>
配置加密盐值
jasypt:
  encryptor:
  	# password值任意,最好随机字符
    password: hhX4FzbwcT
工具类使用
import org.jasypt.encryption.pbe.StandardPBEStringEncryptor;

public class JasyptTest {

    /**
     * 加密盐值,使用完成后进行删除,或者不能提交到`生产环境`,比如:
     */
    private final static String PASSWORD = "hhX4FzbwcT";


    public static void main(String[] args) {

        PooledPBEStringEncryptor encryptor = new PooledPBEStringEncryptor();

        SimpleStringPBEConfig config = new SimpleStringPBEConfig();
        // 用于设置加密密钥。密钥是用于加密和解密字符串的关键信息。
        config.setPassword(PASSWORD);
        // 加密算法的名称,jasypt-3.0.5版本后默认的加密方式
        config.setAlgorithm("PBEWITHHMACSHA512ANDAES_256");
        // 用于设置加密时迭代次数的数量,增加迭代次数可以使攻击者更难进行密码破解。
        config.setKeyObtentionIterations("1000");
        // 加密器池的大小。池是一组加密器实例,可确保加密操作的并发性。
        config.setPoolSize("1");
        // 用于设置JCE(Java Cryptography Extension)提供程序的名称。
        config.setProviderName("SunJCE");
        // 用于设置生成盐的类名称。在此配置中,我们使用了org.jasypt.salt.RandomSaltGenerator,表示使用随机生成的盐。
        config.setSaltGeneratorClassName("org.jasypt.salt.RandomSaltGenerator");
        // 用于设置Jasypt使用的初始化向量(IV)生成器的类名。初始化向量是在加密过程中使用的一个固定长度的随机数,用于加密数据块,使每个数据块的加密结果都是唯一的。在此配置中,我们使用了org.jasypt.iv.RandomIvGenerator类,该类是一个随机生成器,用于生成实时随机IV的实例。这样可以确保每次加密的IV都是唯一的,从而增加加密强度。
        config.setIvGeneratorClassName("org.jasypt.iv.RandomIvGenerator");
        // 指定加密输出类型。在此配置中,我们选择了base64输出类型。
        config.setStringOutputType("base64");
        encryptor.setConfig(config);

        // 明文1
        String name_encrypt = "root";
        // 明文2
        String password_encrypt = "123456";

        // 明文加密
        String encrypt1 = encryptor.encrypt(name_encrypt);
        String encrypt2 = encryptor.encrypt(password_encrypt);
        System.out.println("明文加密1:" + encrypt1);
        System.out.println("明文加密2:" + encrypt2);

        // 密文解密
        String decrypt1 = encryptor.decrypt(encrypt1);
        String decrypt2 = encryptor.decrypt(encrypt2);
        System.out.println("密文解密1:" + decrypt1);
        System.out.println("密文解密2:" + decrypt2);
    }
}
加密配置使用
sys:
 name: ENC(Yt36hceu3xGXEzrz2jCPjvalaXQ5yIHE04SVT6lIkcktrxqtBZrlivkAkA9/9oZ2)
 password: ENC(0Ci6irPOko9IG+hBZJAGoguIuE52gF/XiigCV4DwLm6NfkoyvV4Etgc9FzKK3MYl)
测试
@RestController
public class TestController {

    @Value("${sys.name}")
    private String name;

    @Value("${sys.password}")
    private String password;

    @GetMapping("/test")
    public void test() {
        System.out.println("name = " + name);
        System.out.println("password = " + password);
    }
}
原理
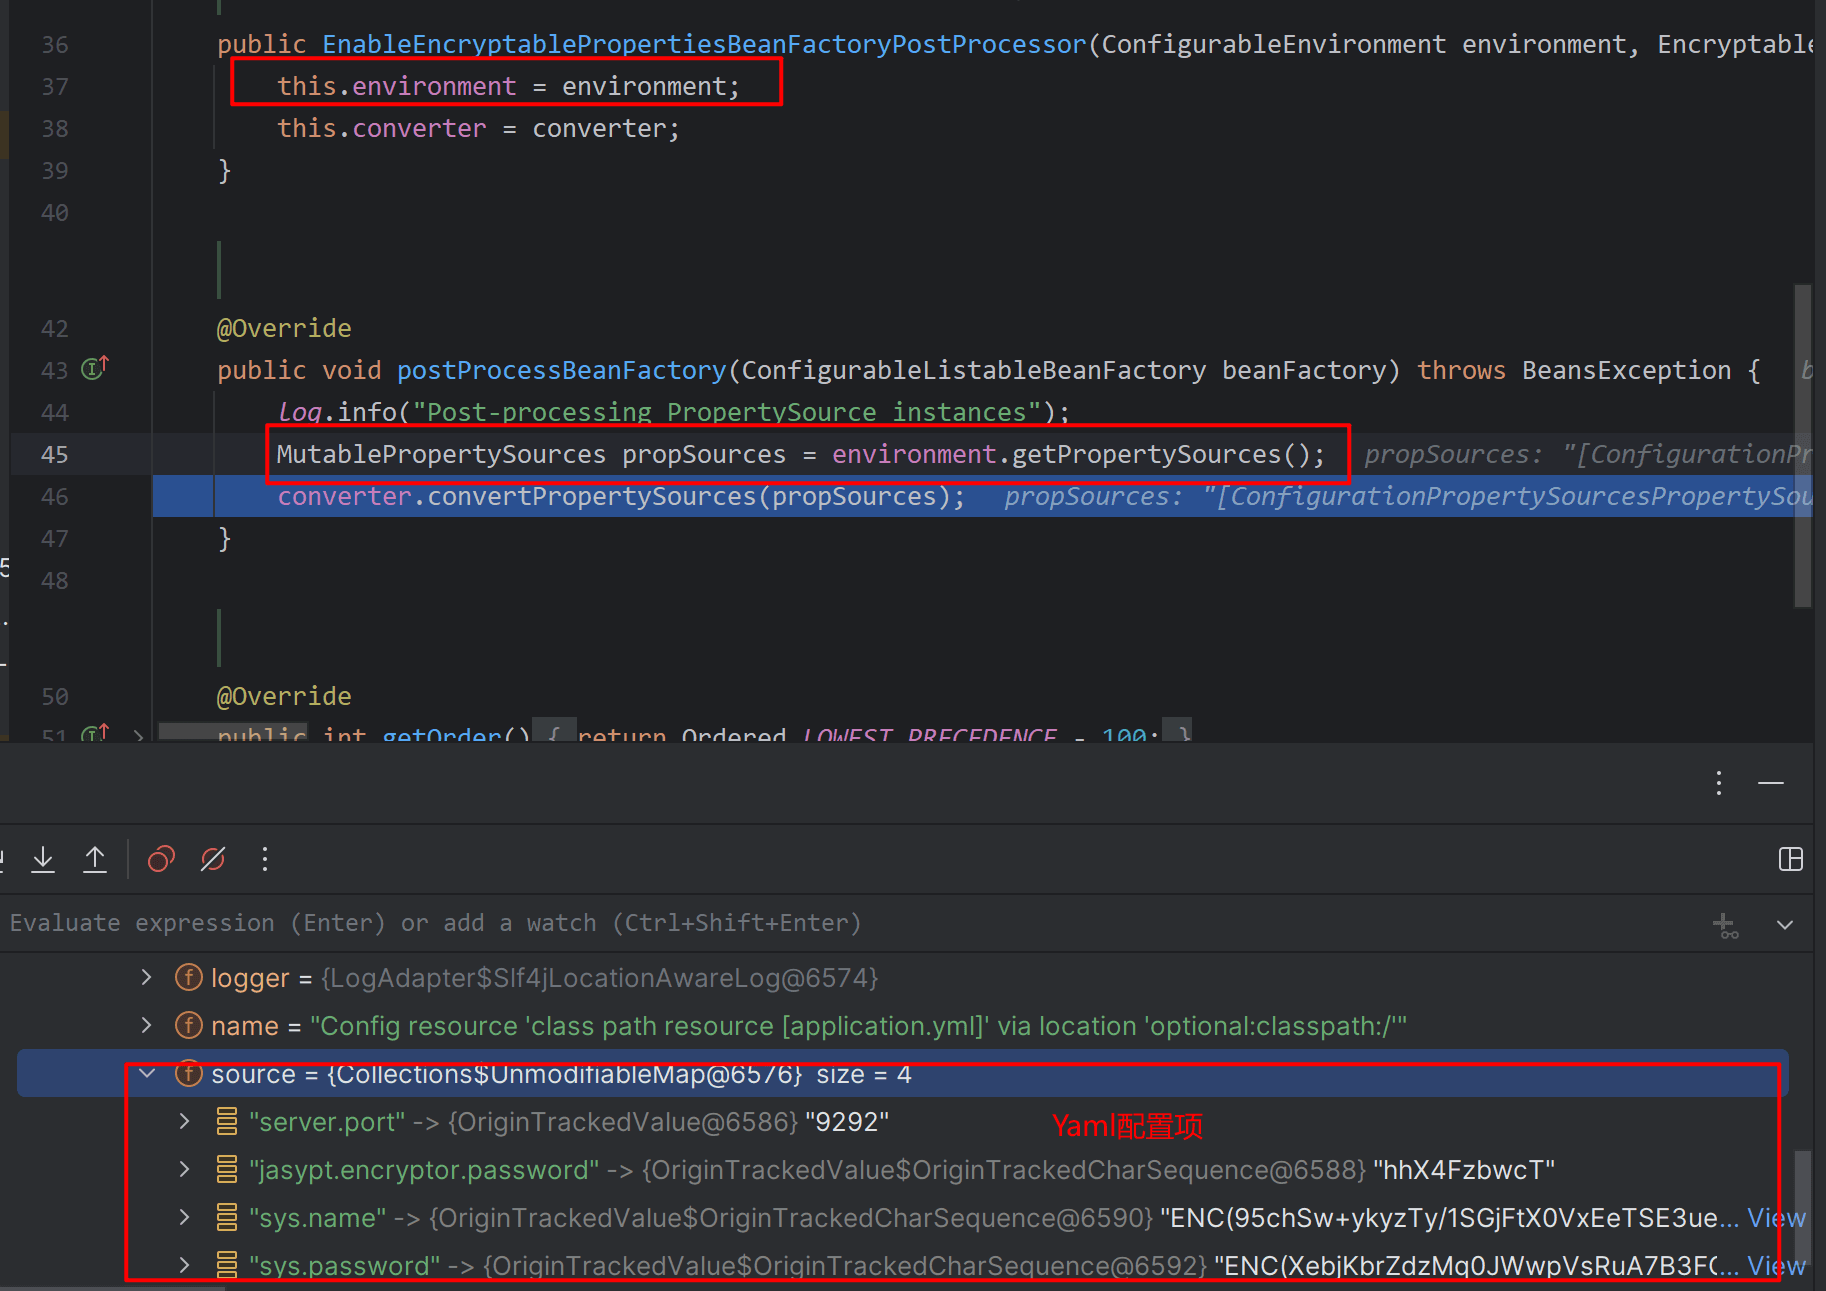
1、在jasypt-spring-boot-starter包的自动配置类JasyptSpringBootAutoConfiguration中通过@Import注解引入了EnableEncryptablePropertiesConfiguration配置类,该类中environment参数储存了yaml文件元数据;
2、在postProcessBeanFactory方法中,调用environment.getPropertySources()方法获取yaml配置项目;
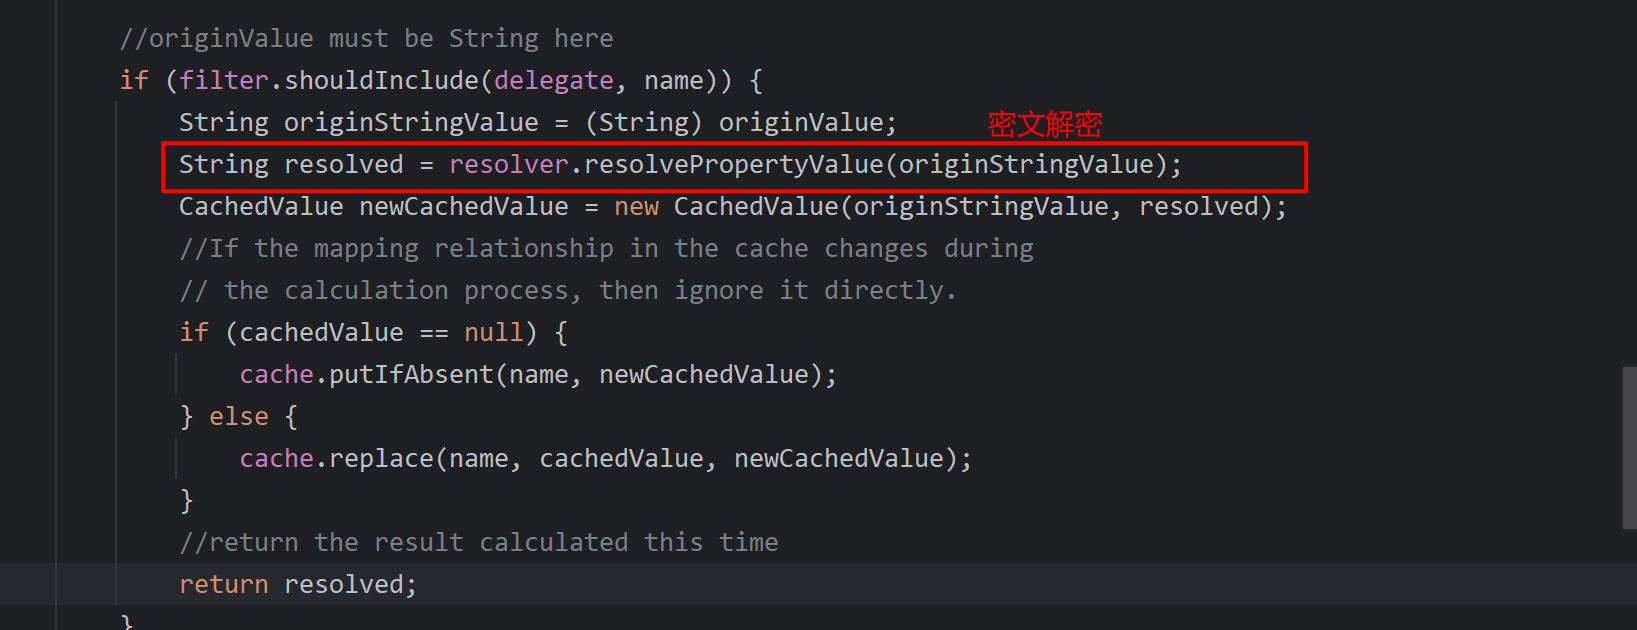
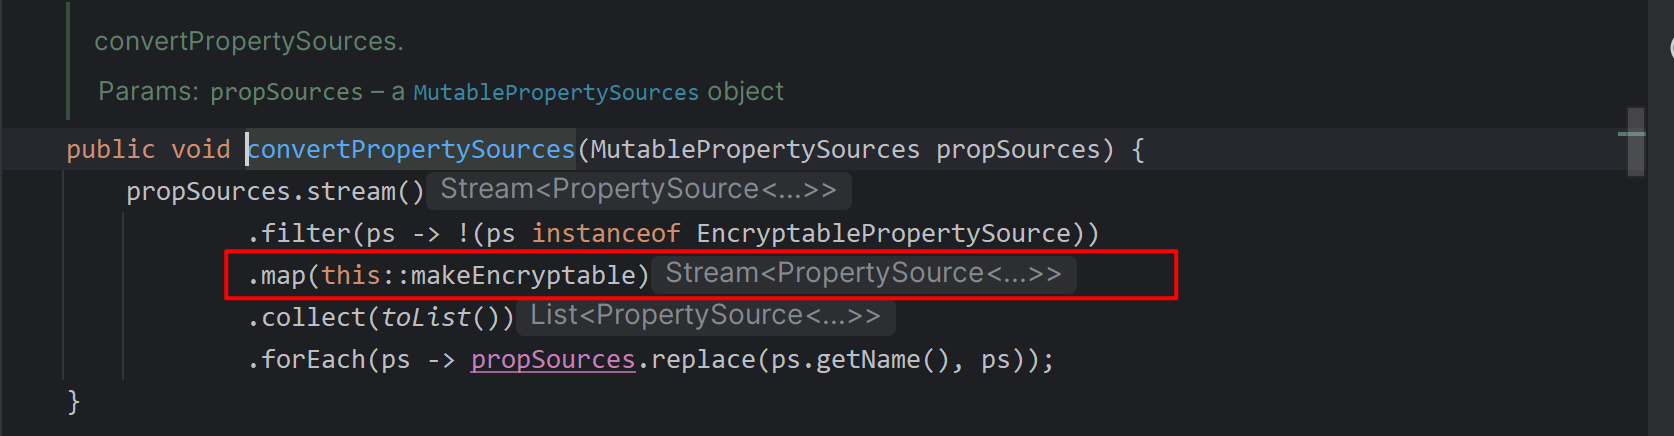
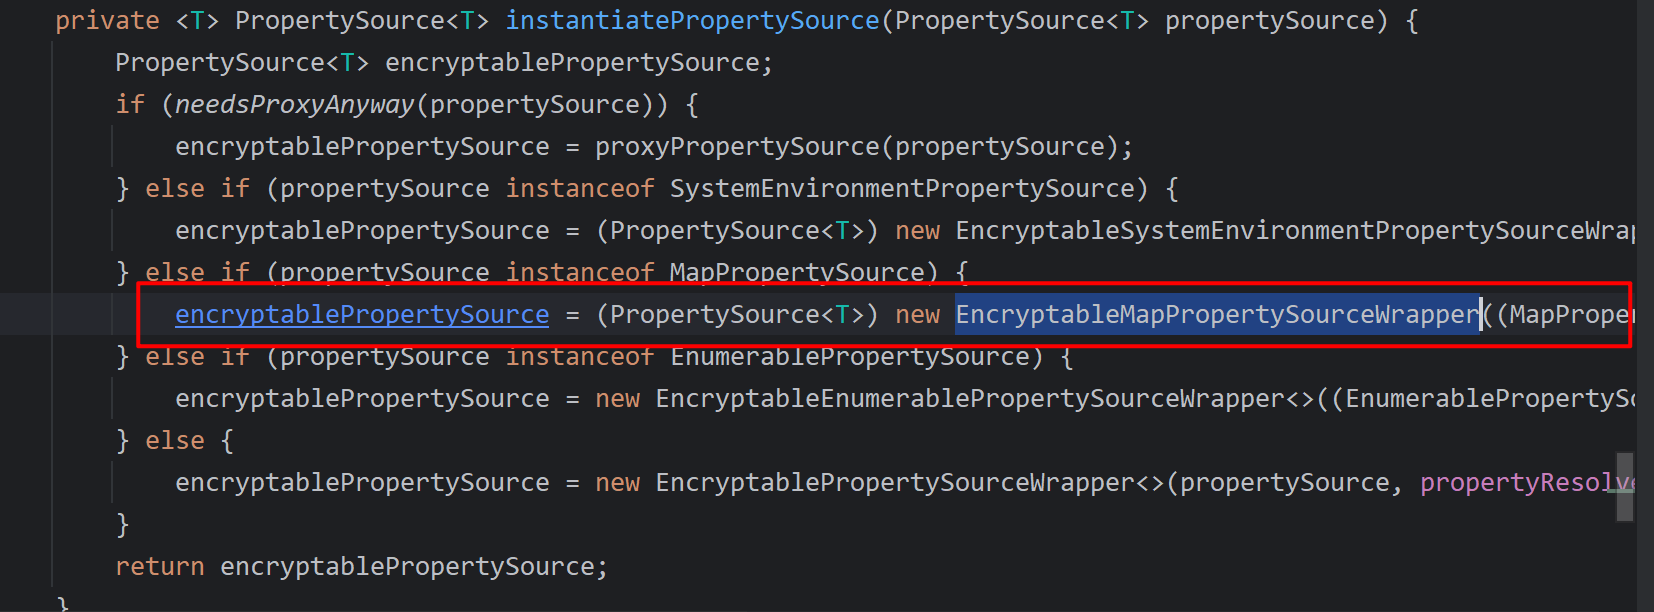
3、通过convertPropertySources进行数据转换,修改yaml中配置项值,具体实现为调用instantiatePropertySource()方法,在该方法中,匹配propertySource instanceof MapPropertySource,转化为EncryptableMapPropertySourceWrapper对象;


4、EncryptableMapPropertySourceWapper类中,通过getProperty(name)方法进行匹配,匹配成功后调用resolver.resolvePropertyValue进行ENC配置的解密并且替换原有的propertySource值;